Having been a very satisfied myNode user since last year and more recently becoming a huge fan of the work the Samourai team are doing with their coinjoin implementation Whirlpool and feature packed mobile wallet, it felt only right that I should give RoninDojo a run out. Given that myNode has become one of the default options for budding new node runners, I thought I’d document my RoninDojo experience to help spread the word about another one of the options on the table.
RoninDojo is an installation assistant for the Samourai Wallet Dojo which runs on the Manjaro minimal operating system. Just like any other Bitcoin node, it runs on a single board computer like a Raspberry Pi4 or Odroid N2 and you can achieve a very capable setup for a little over $250. The Ronin Wiki page has different hardware setup suggestions depending on how much you would like to spend.
RoninDojo is, by design a more focused node very much geared towards being the perfect companion for your Samourai Wallet. However, thanks to the inclusion of Electrum Rust Server (electrs) you can use Ronin as a backend for any hardware or desktop wallet. Because Ronin is very much Samourai wallet focused you wont find any Lightning or BTCPay Server integrations that you may be used to seeing in other node designs.
So what does RoninDojo come with?
Tor - By default, to maintain your privacy. Also includes a Tor v3 onion address to access your ‘Dojo Maintenance Tool’ where you can perform more complex tasks if you so wish.
Dojo - Your own backend server, enforcing your Bitcoin ruleset.
Whirlpool CLI - Once connected and set up you can start the mix in your Samourai wallet and then let Whirlpool CLI seamlessly take over and provide you with 24/7 (free) remixing of your UTXO’s.
Electrum Rust Server (Electrs) - Indexes and queries your node to verify transactions and balances
Whirlpool Stat Tool - Created by @LaurentMT, Whirlpool stat tool helps you calculate the anonymity set for your UTXO’s
Onto the setup
It’s worth noting that this article is not designed to be a full setup tutorial, more an explanation of my experiences. For the full step by step guide click here.
During the initial setup I ran into some minor issues which weren’t anything to do with Ronin itself but I thought it would be worth sharing so others can avoid the same mistake. I decided to try and save a few $ on the hardware by buying an internal SSD and enclosure rather than an external SSD (as recommended by the Ronin team!). I have it all sorted now after some tinkering but lesson learned there, listen to the experts and go with the recommended kits.
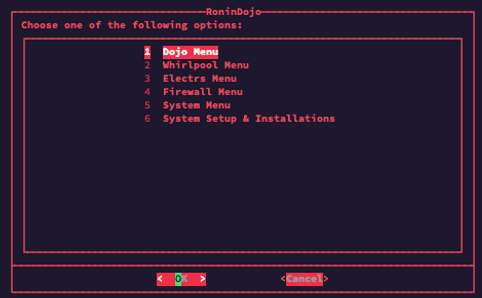
To get from zero to your Ronin ‘dashboard’ is simple…
-
Flash the SD card
-
Put together the hardware
-
Plug it into power and your router
-
Complete the Manjaro operating system setup
-
Running 6 commands via an SSH tool like Terminal (Mac) or Putty (Windows)
Don’t let the last step put off the non technical user and I don’t know a single line of code! The guide tells you when to enter each command and you can literally just copy and paste them.
You will now see your dashboard and can move on to the installation of your Dojo which includes the initial block download (IBD) where your node will download a copy of the entire Bitcoin blockchain and store onto your SSD. During the Dojo installation you will be asked if you wish to install Electrs which is advisable if you want to connect any external wallets to your RoninDojo.
Depending on your internet speeds and chosen hardware the IBD + Electrs install can take anywhere between 3-5 days and you can check its progress at any time by visiting the Dojo logs. I found it strangely satisfying watching the blocks fly past as my node caught up to the tip of the chain.

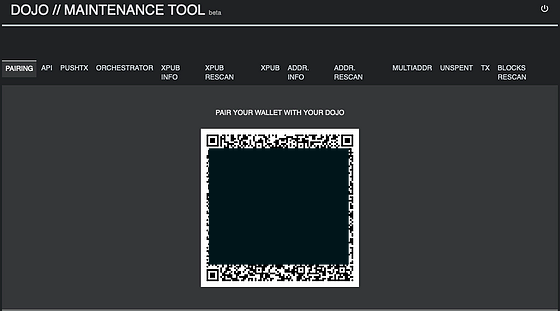
After the block download is complete you can then connect your Samourai Wallet to your very own Dojo backend which could not be simpler. Using the credentials given by your RoninDojo, log into your Dojo Maintenance Tool using Tor browser and scan the pairing QR code. Now, whenever you send or receive a transaction you don’t need to rely on any third parties or leak any sensitive information.
That’s it, your basic Bitcoin node is running and verifying every transaction made on the network. The following steps are optional for those wanting to use the extra functionality RoninDojo offers.
Next stop, Whirlpool CLI. Again installation is just a couple of clicks away from the main dashboard and will be installed in a matter of minutes. You’ll then need to pair your Whirlpool desktop application to your newly installed CLI instance on your RoninDojo. The CLI on your RoninDojo and the Whirlpool GUI on your normal computer essentially do the same thing except the RoninDojo CLI instance runs 24/7. This means that after setup you don’t need to leave your phone or desktop app running to achieve those free remixes that build your anonymity set over time.
You can also connect your Electrum desktop wallet to your Electrs. Electrum Desktop is a popular wallet interface with almost universal compatibility for hardware wallets and also offers multisig support for more advanced users.
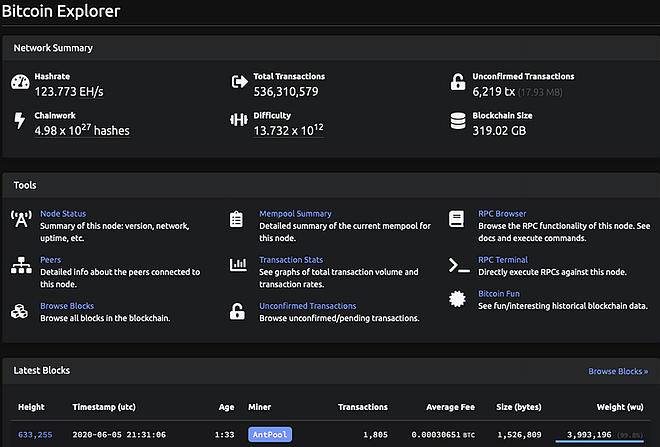
With RoninDojo you also get your very own Bitcoin explorer, accessible via Tor. With this you can look at pretty much any Bitcoin related data you can imagine. Hashrate, mempool, transaction stats, historical blocks to name just a few. You also get full RPC command library to run additional tasks on your node such as gettxoutsetinfo which allows you to verify the current total supply of bitcoin.
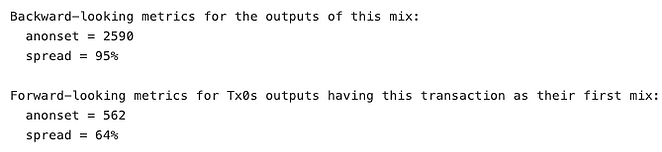
Finally there is Whirlpool Stat Tool which is a really cool feature that allows you to paste in a txid for one of your UTXO’s that has been through Whirlpool. It will then supply you with both backward and forward looking anonymity sets for that UTXO. Click here for a full explanation of these terms.
One of my favorite parts about RoninDojo is that although the team have done a fantastic job of simplifying the setup process, they haven’t obfuscated everything so far away from the end user that they don’t know whats going on under the hood. Prior Linux experience is not necessary at all to run RoninDojo but for those who want to get under the surface and play around, you absolutely can do and the team are all too happy to help.
In summary, RoninDojo is a very focused Bitcoin node that excels at everything you would expect it to with the added bonus of Whirlpool integration which is essential for anyone wanting to maintain their on chain privacy. Don’t let the lack of a super flashy GUI deter you (although that’s coming very soon 😉), RoninDojo is very intuitive to navigate, even for tech novices like me and I thoroughly enjoyed the setup process.

The Ronin team have also given me a snapshot of their roadmap which looks very exciting…
-
Community GUI that gives Dojo control and pairing anywhere through Tor. (pic above)
-
RAID and LUKS support for encrypted and redundant storage
-
RoninOS for any single board computer like a Raspberry Pi to make installation even easier
-
Premium GUI which will include:
-
Full RoninDojo control and device control
-
Whirlpool GUI
-
Desktop watch-only wallet and broadcasting transactions
If you’re a big Samourai Wallet fan then look no further, RoninDojo is the perfect backend companion. RoninDojo is maintained by devs that work very closely with the Samourai Wallet team and it is often the first to gain access to any improvements or big fixes they implement.
The support from the devs and the Telegram group is second to none and I would happily recommend RoninDojo any budding node runner.
If you are interested in learning more visit their Wiki page, drop into the Telegram chat and give this Stephan Livera podcast with Zelko a listen. Finally @_k3tan from Ministry of Nodes has done a great video of the setup process.
Be sure to follow the RoninDojo team on Twitter.
If you are already a RoninDojo user and want to contribute to the team then visit paynym.is/+ronindojo or scan the QR below