
How to Fork an Open Source Project
Diving into Open Source software might feel like jumping into the deep end if you’re new to it. But don’t worry, we’ve got you covered! With this guide, we will break down each aspect of the process. Using Bitcoiner.Guide as our playground, we will walk you through the process of writing an article and pitching changes to be added into the main project.
Step 1: Setting Up a GitHub Account and Installing Necessary Tools
Necessary steps
Let’s ensure you have all the necessary tools installed on your computer.
-
A GitHub Account: An account on GitHub is needed to fork the project and submit your changes. If you don’t have one yet, create an account on GitHub.
-
Git: Git is a version control system that lets developers track and manage changes to their code. It’s essential for working with GitHub. Git is pre-installed on lots of machines. To check, open your terminal and type
git -v. If it’s installed, then this will return the Git version. If not visit this guide. -
Visual Studio Code: This is a versatile text editor with built-in features that make working with Git easier. Download it here.
-
Ruby and Bundler: Bitcoiner.Guide uses Beautiful Jekyll, a static site generator built in Ruby. As such, you need Ruby to run the project locally. Bundler is a Ruby gem that manages other Ruby gems in a project. To install these:
- For macOS and Linux users:
- Ruby usually comes pre-installed. To check, open your terminal and type
ruby -v. If it’s installed, this will return the Ruby version. - If not, you can install Ruby using a version manager like rbenv or RVM. Here is a detailed video on how to download rbenv and Ruby using Homebrew.
- Once Ruby is installed, install Bundler by typing
sudo gem install jekyll bundlerin your terminal. This command will install two Ruby “gems” - small packages of Ruby code - that provide the Jekyll and Bundler functionality.
- Ruby usually comes pre-installed. To check, open your terminal and type
- For Windows users:
- You can download Ruby from RubyInstaller. After installation, it will also allow you to install MSYS2, which you should do.
- Install Bundler by opening “Command Prompt as Admin” from your start menu, then type
gem install jekyll bundler.
- For macOS and Linux users:
Additional information
Opening a terminal depends on the operating system you’re using. Here’s how to do it on the three most common desktop operating systems:
- Windows:
- Via the Start menu: Click the Start button or press the Windows key, type “cmd” or “Command Prompt” in the search bar, and press Enter.
- Via Run: Press
Windows+Rto open the Run dialog, type “cmd” and press Enter.
- macOS:
- Via Spotlight: Press
Command+Spaceto open Spotlight Search, type “Terminal”, and press Enter. - Via Finder: Open a Finder window, go to Applications -> Utilities, and double-click Terminal.
- Via Spotlight: Press
- Linux:
- Via the app grid: Depending on your distribution and environment, you can often find the Terminal app in your app grid or launcher.
- Via keyboard shortcut: On many distributions, you can press
Ctrl+Alt+Tto open a terminal window.
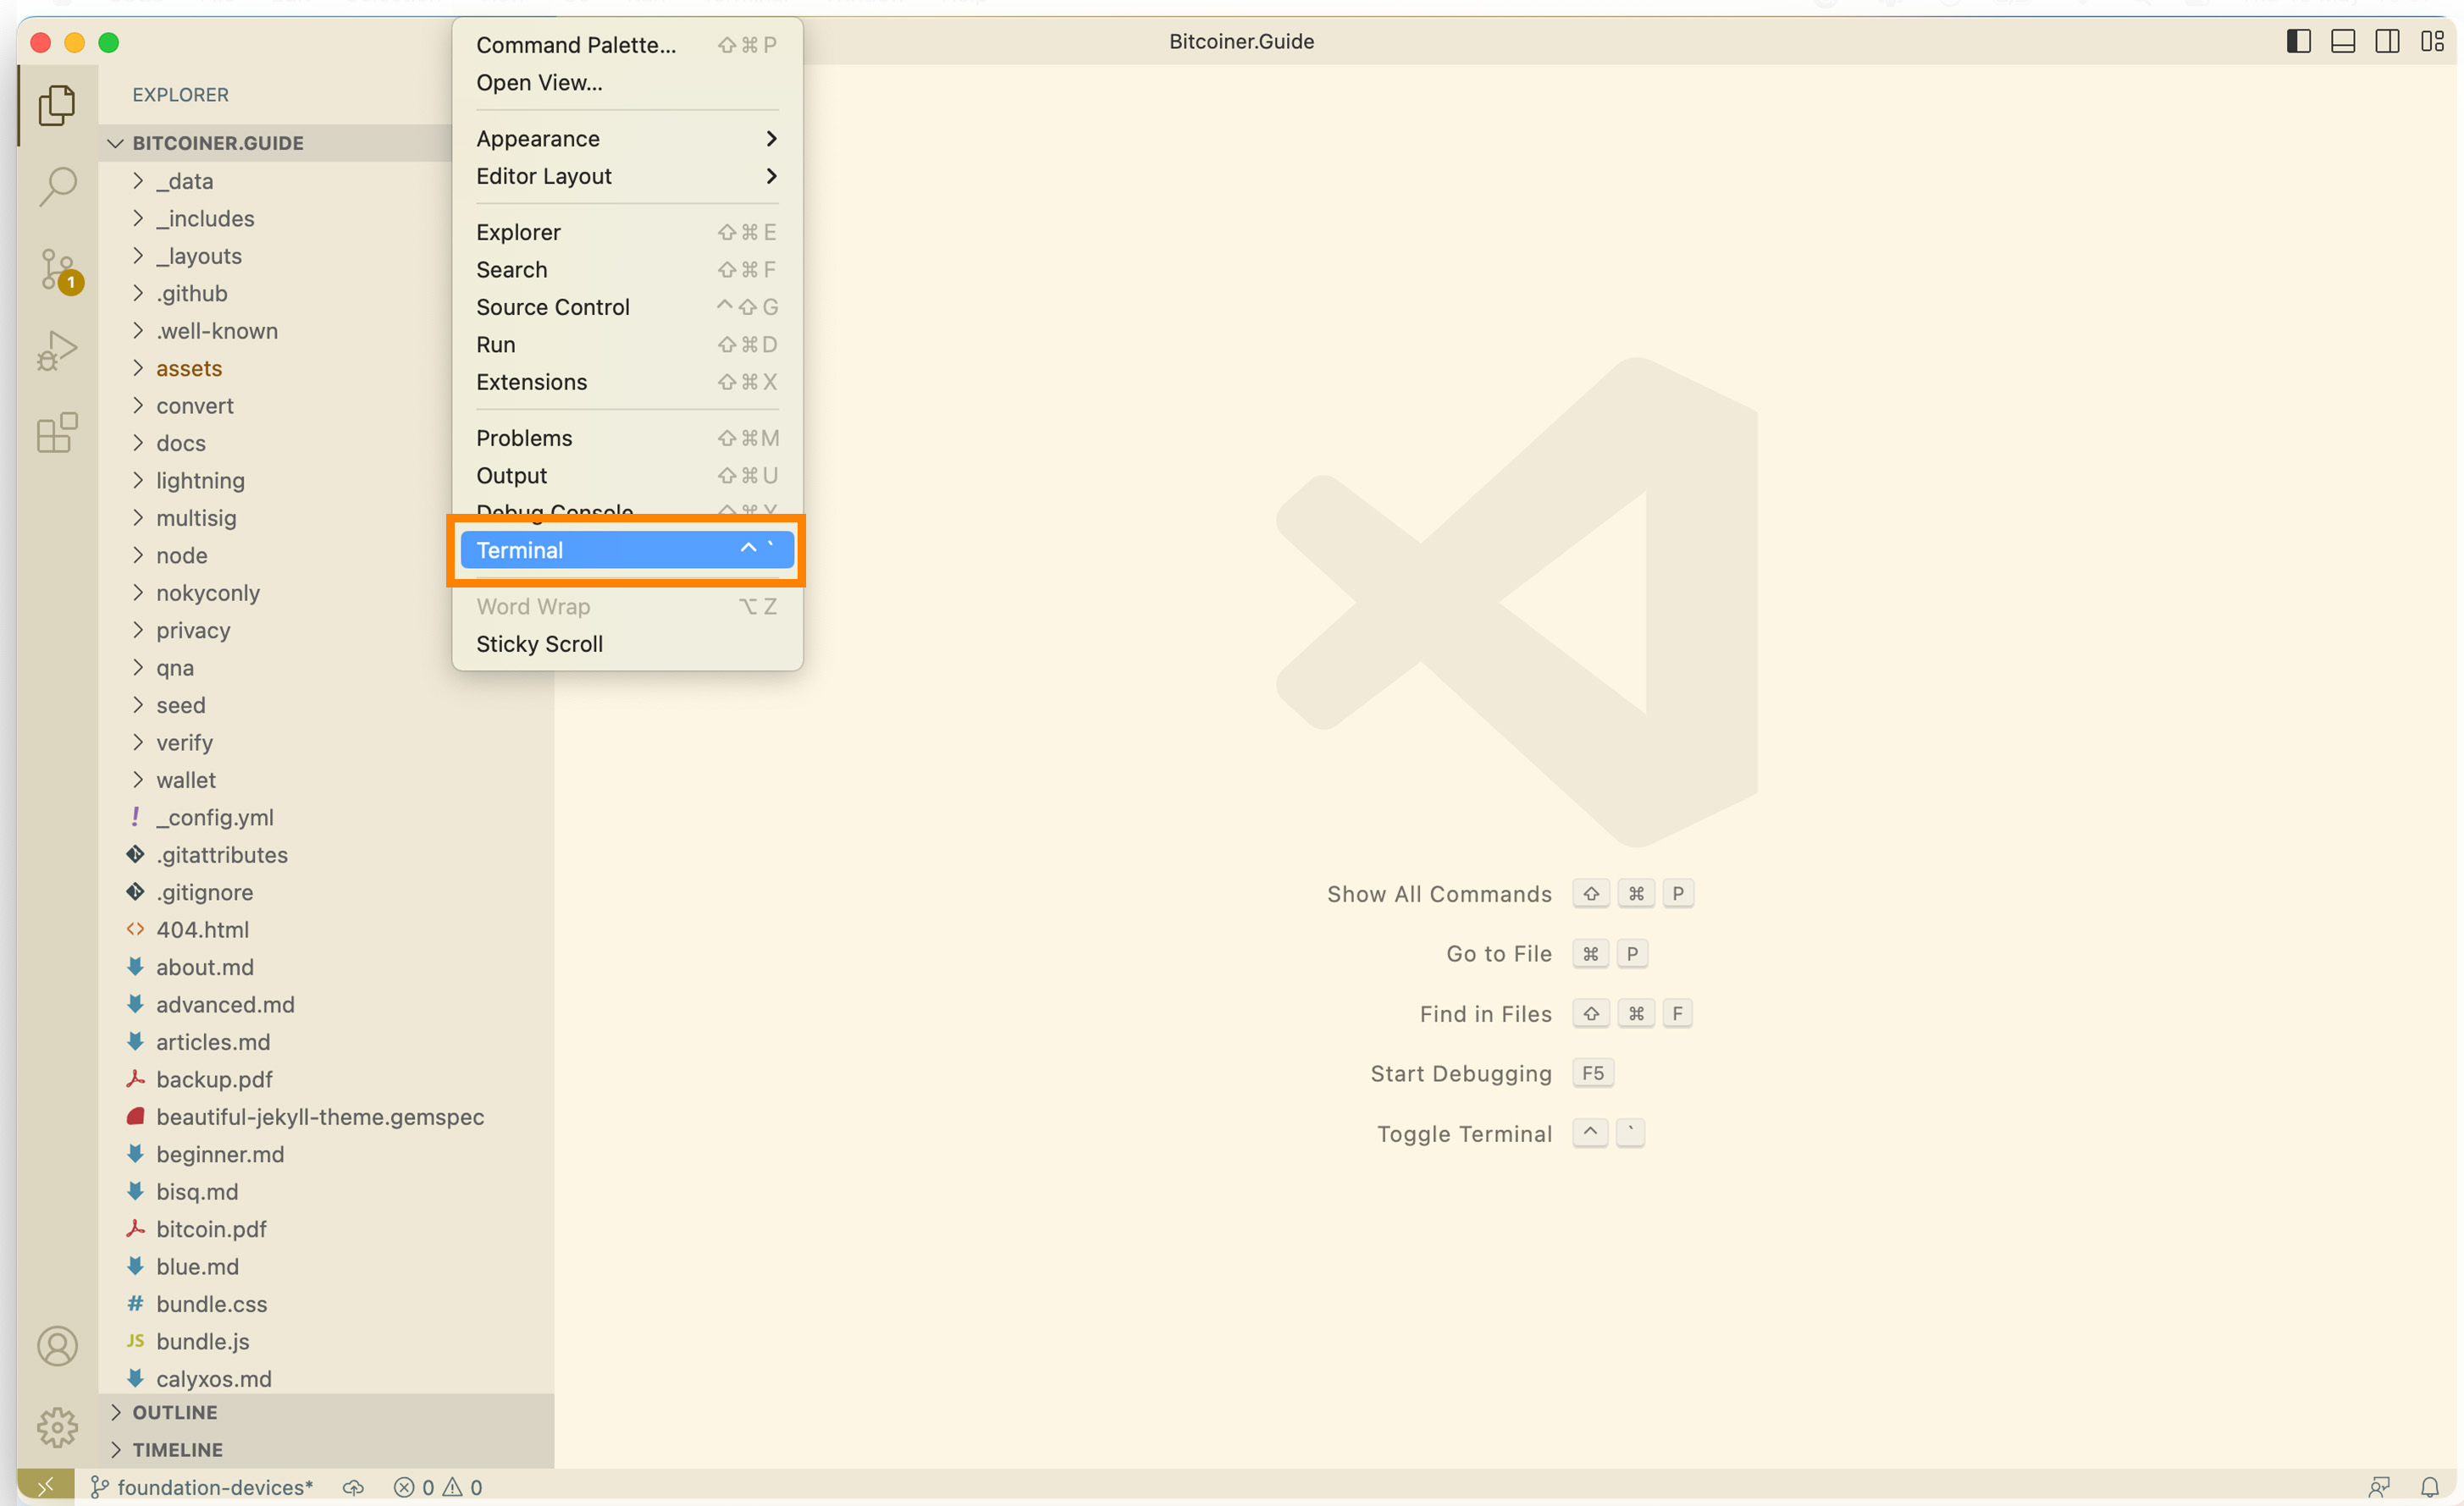
In Visual Studio Code, no matter which operating system you’re using, you can open the terminal by going to the top menu and selecting View -> Terminal.
Step 2: Forking Bitcoiner.Guide
Forking creates a copy of a repository in your own GitHub account. This allows you to make changes without affecting the original project.
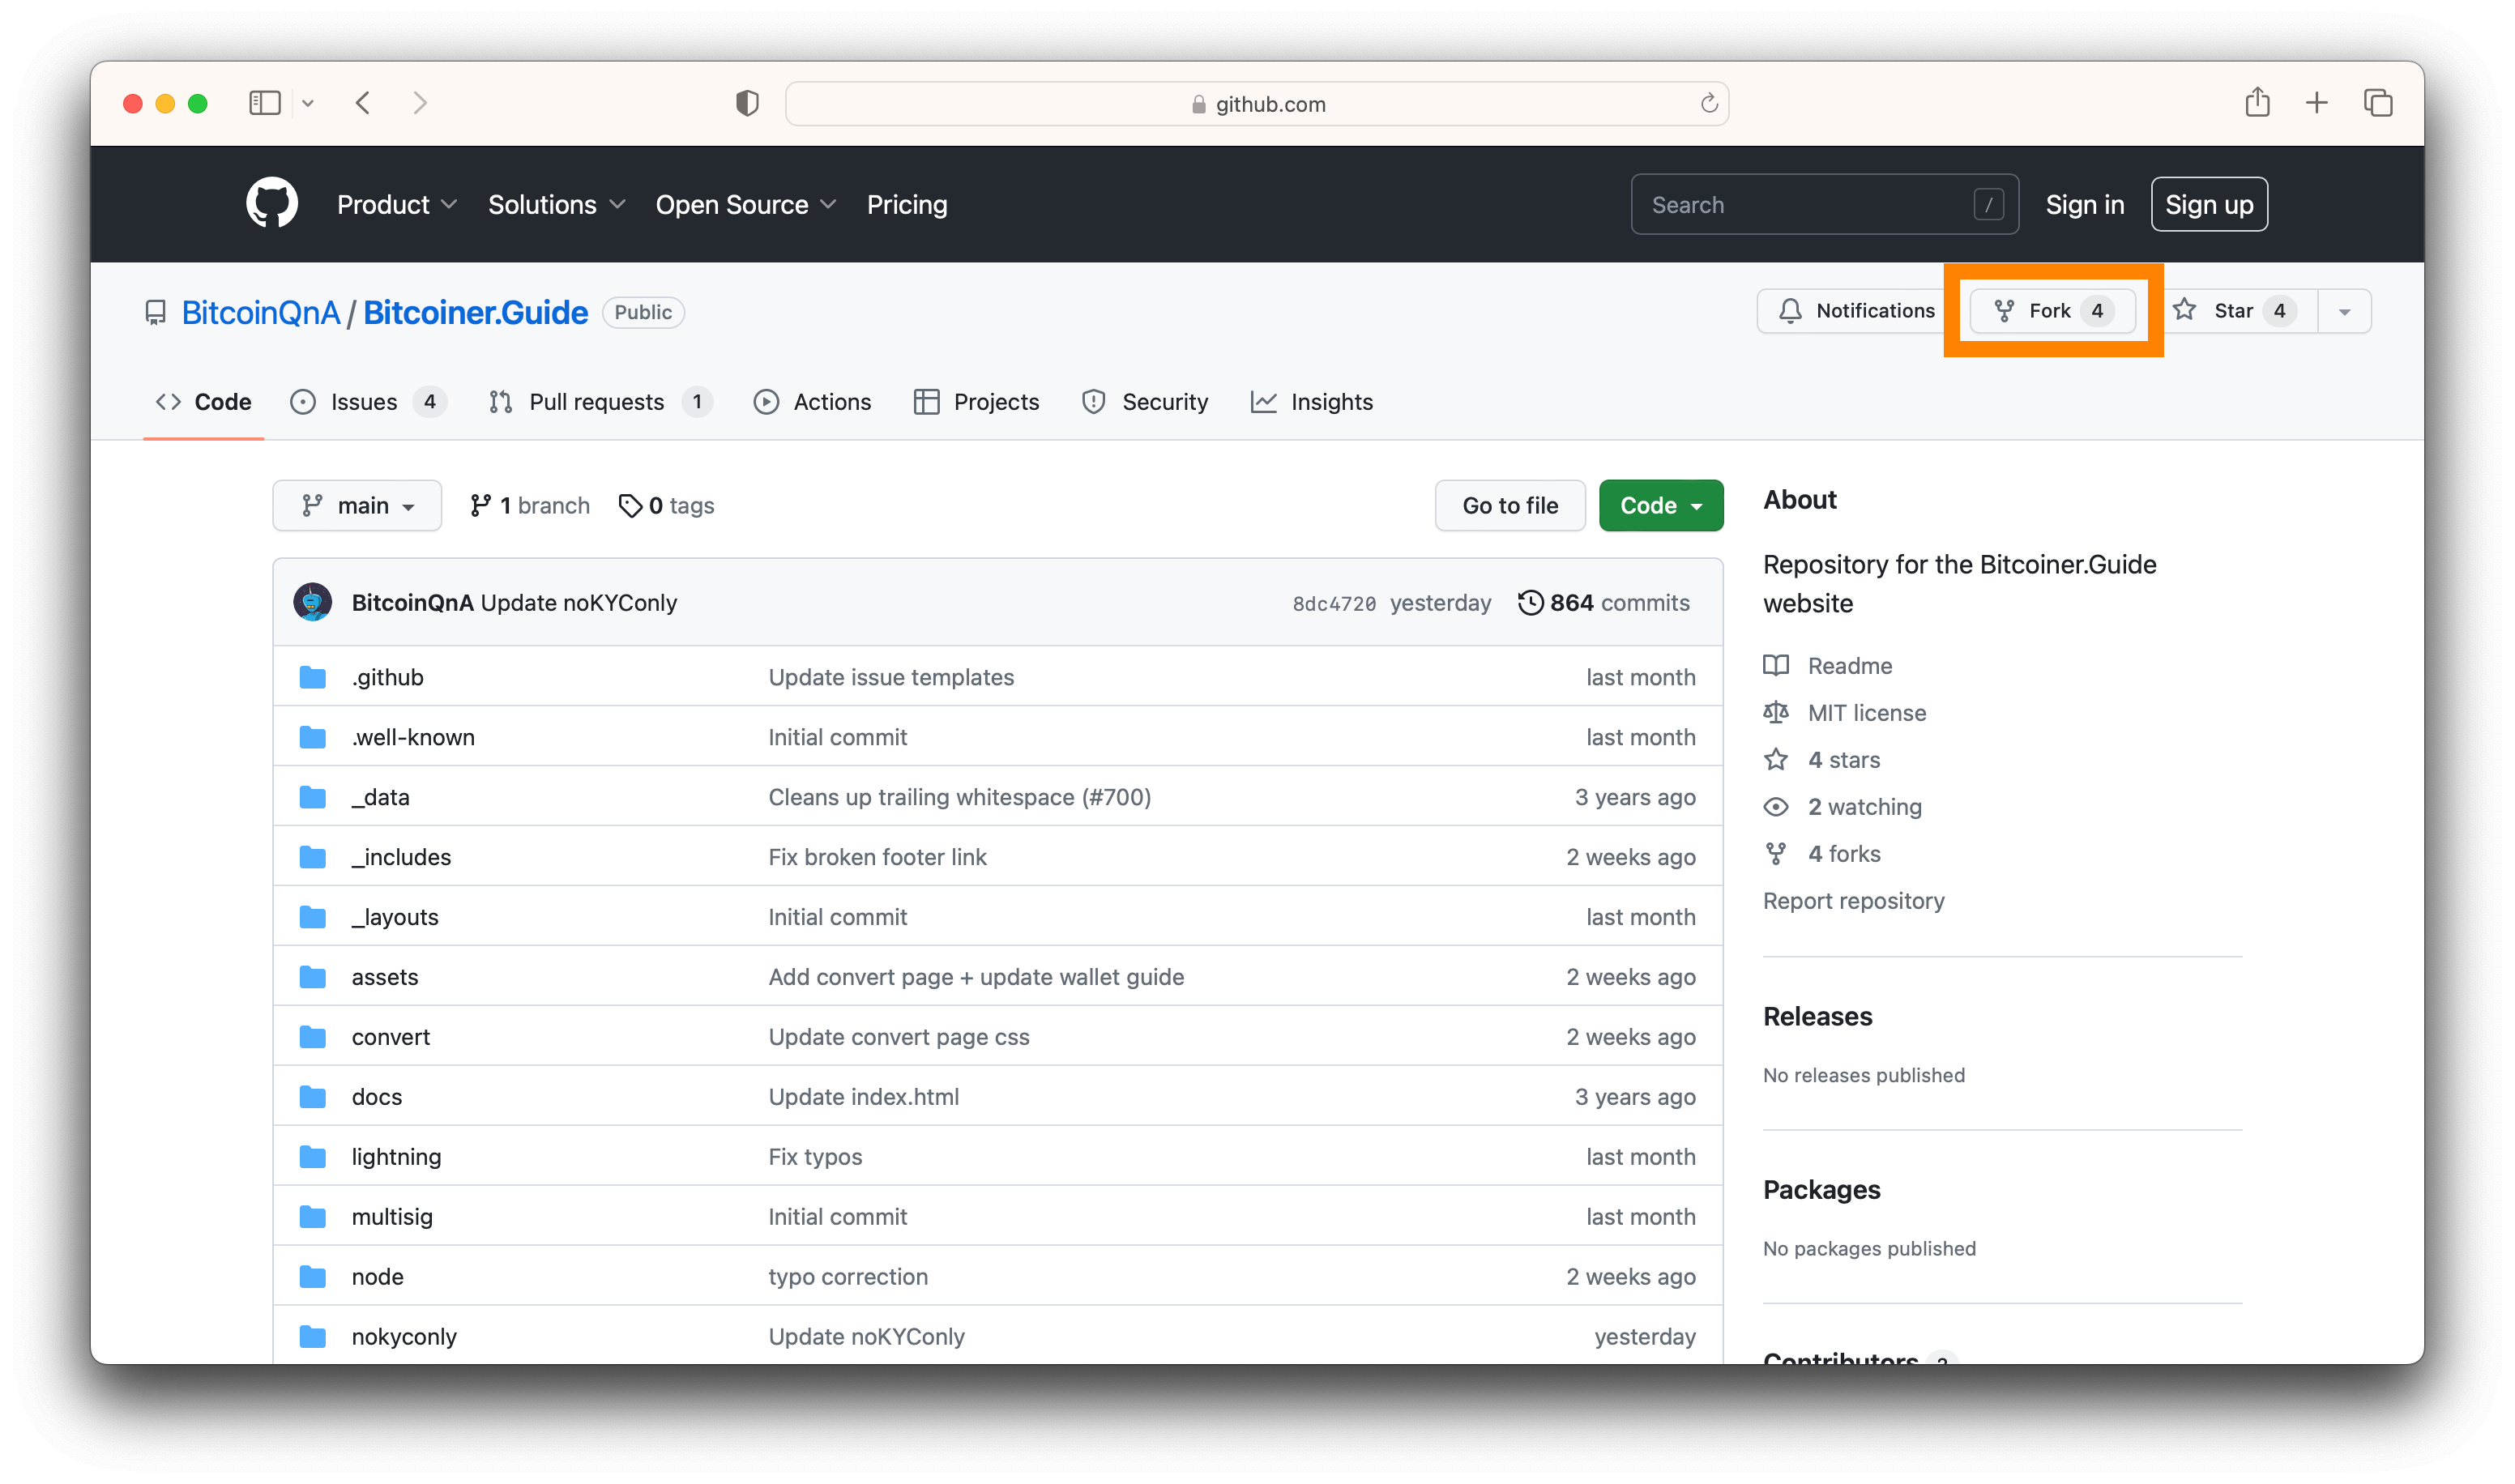
- Navigate to https://github.com/BitcoinQnA/Bitcoiner.Guide.
- Click on the “Fork” button at the top right of the page to create a copy of the project in your account.
Step 3: Clone the Project to your Computer
Now, we need to get a copy of the project on your computer, or “clone” it.
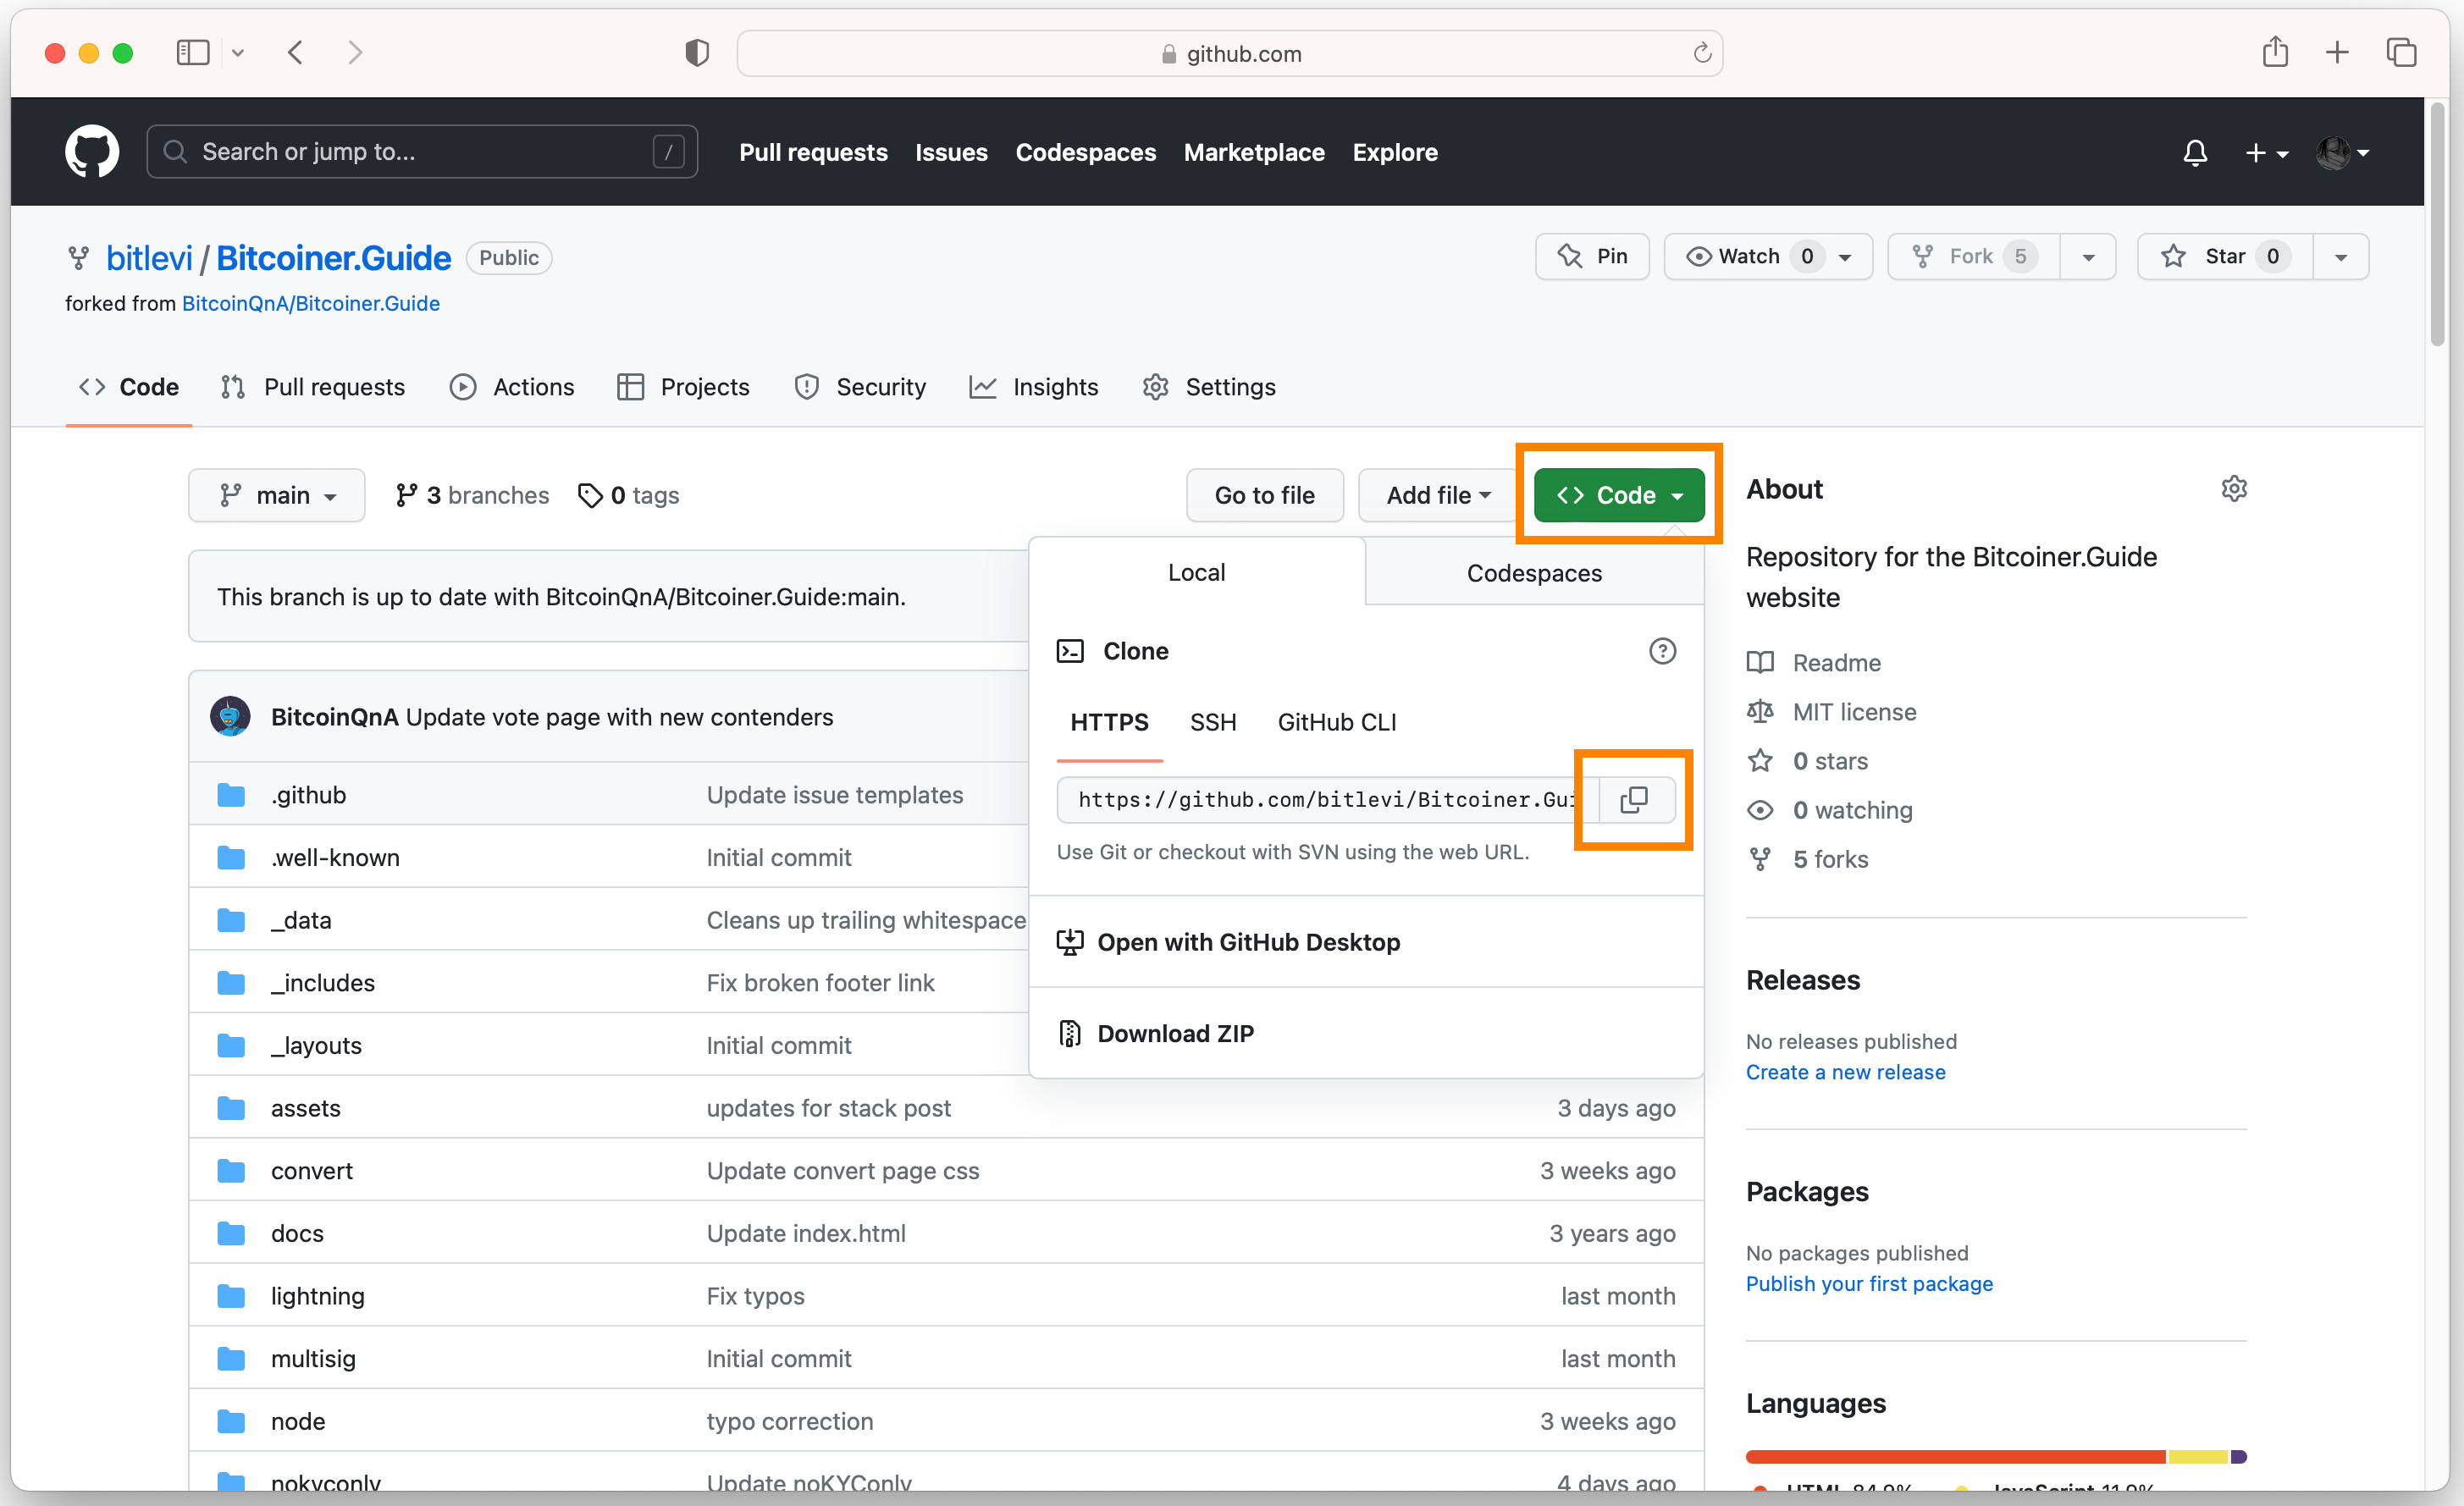
- Go to your fork of the project. The URL should be
https://github.com/YOUR_GITHUB_USERNAME/Bitcoiner.Guide - Click the green “Code” button, then click the clipboard icon to copy the URL.
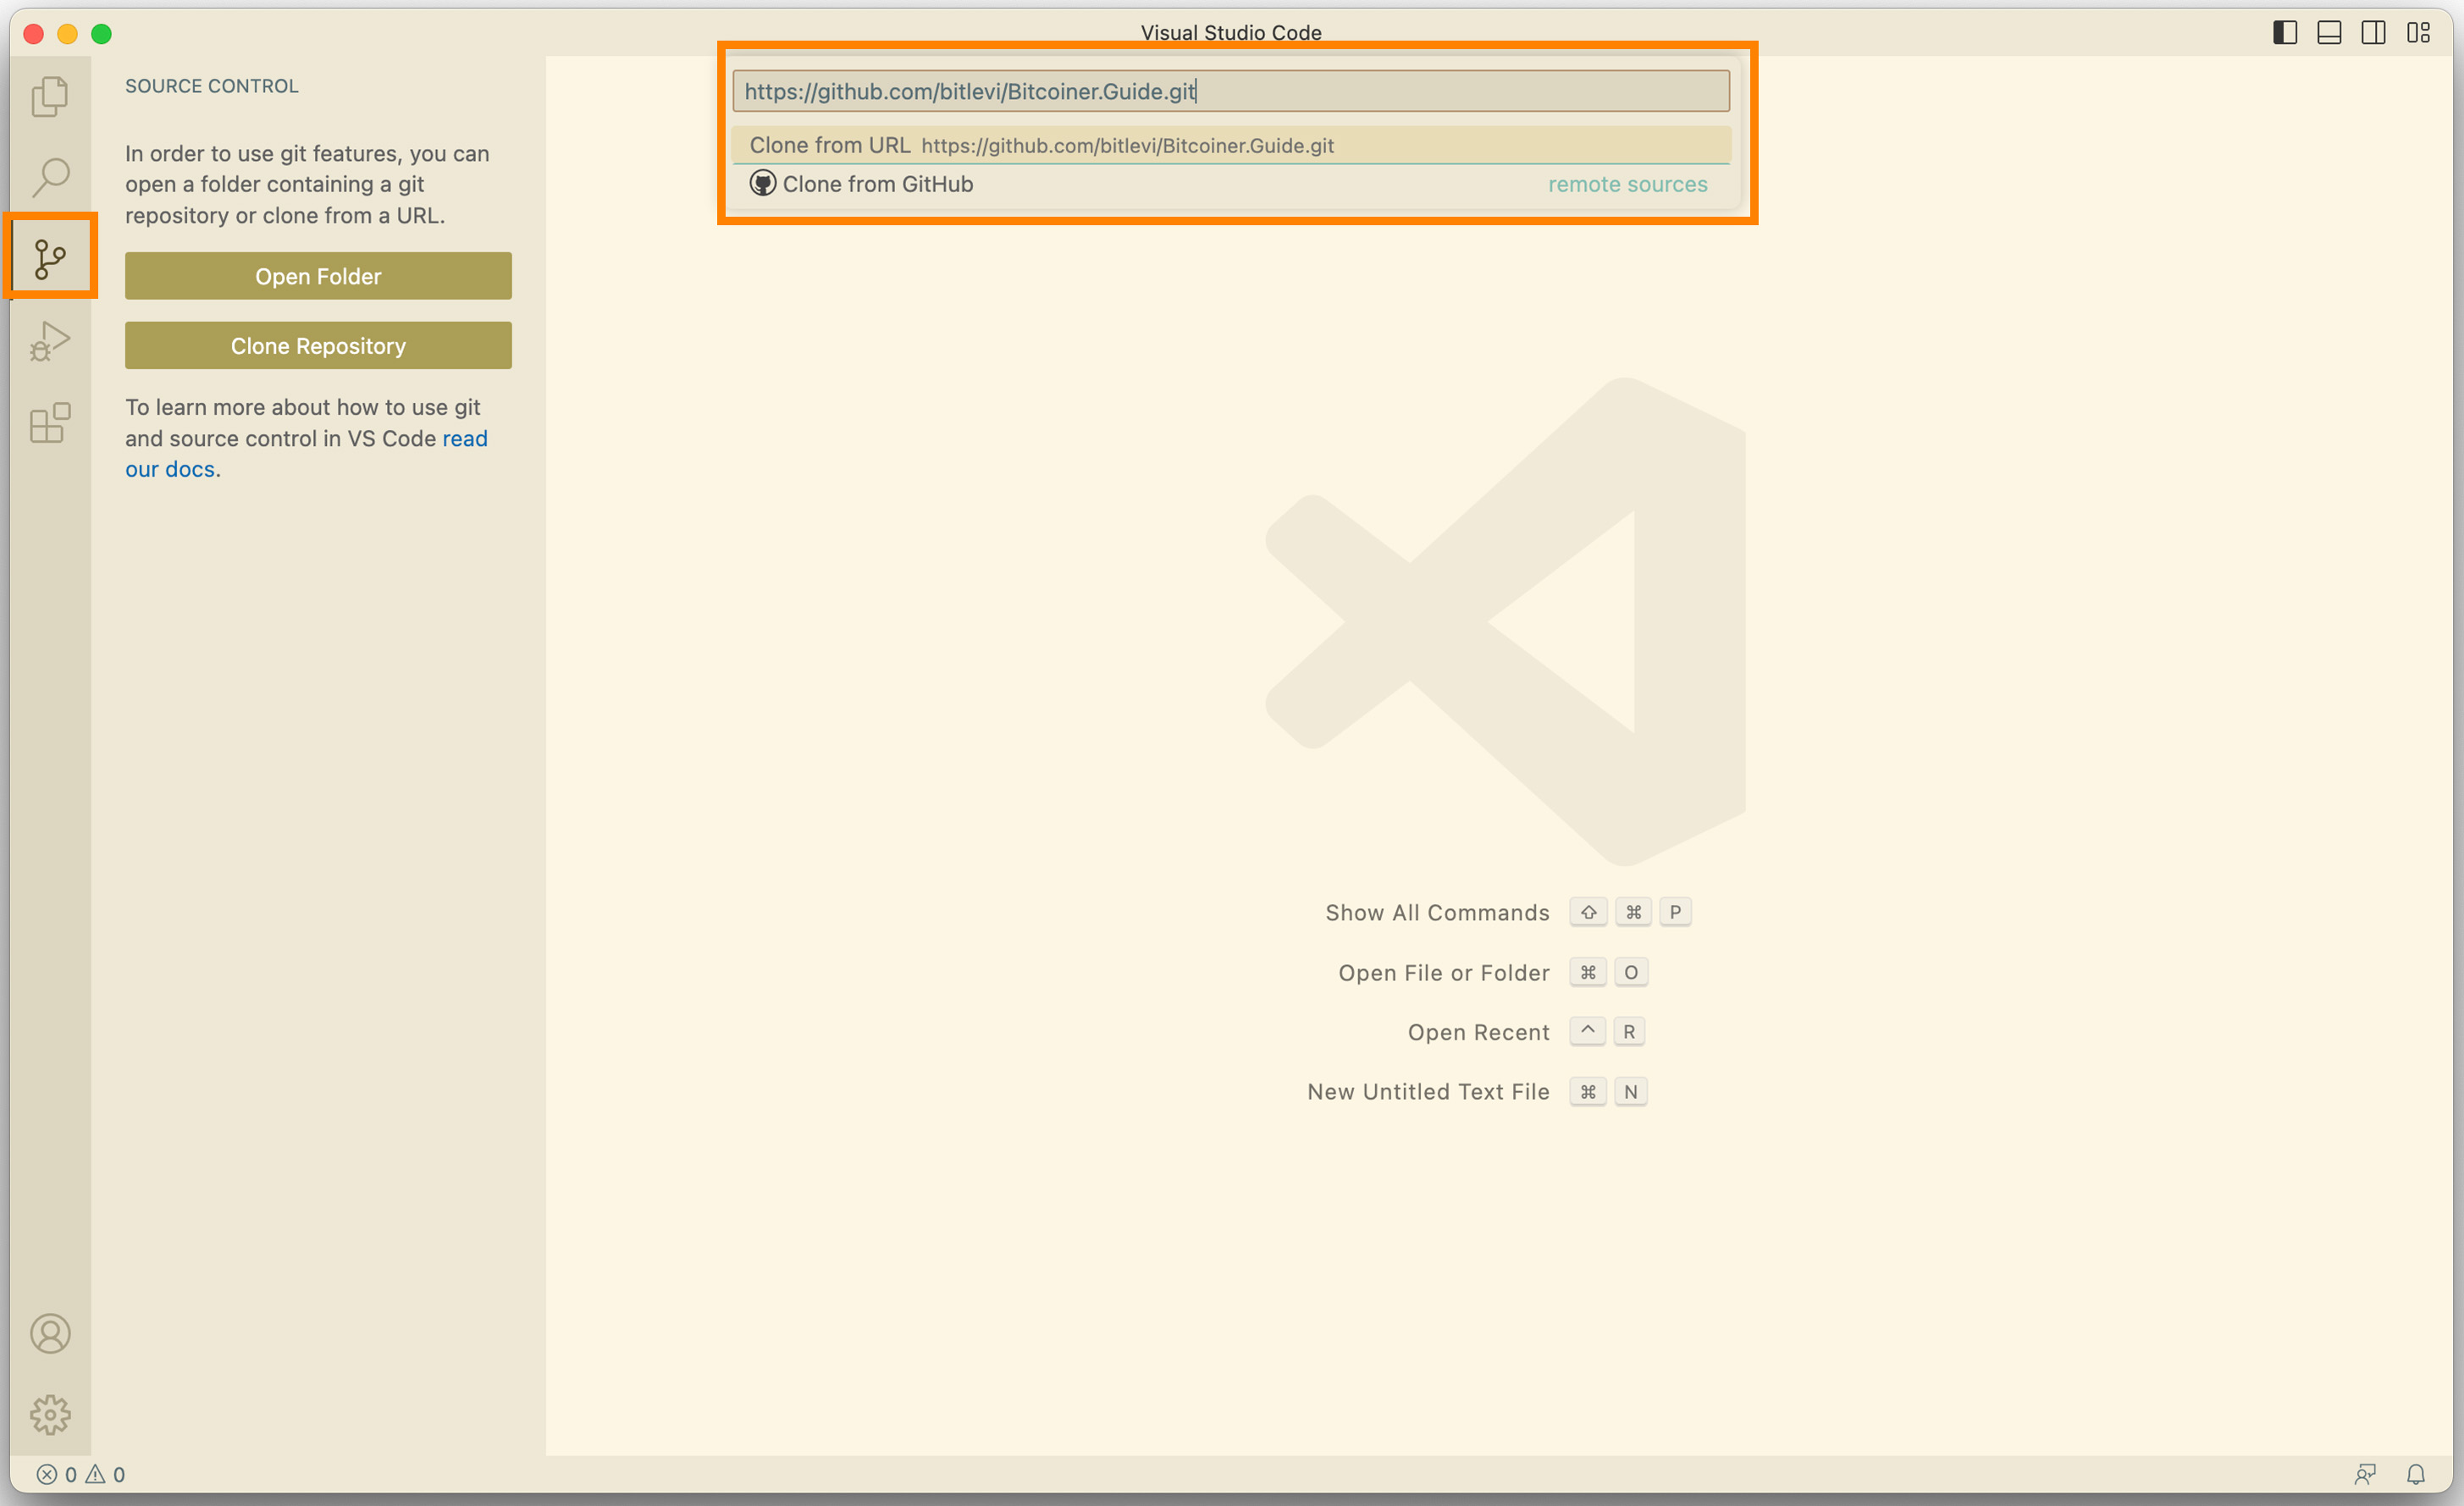
- Open Visual Studio Code.
- Click on the “Source Control” button on the left panel.
- Click on “Clone Repository”.
- In the dialog box that pops up, paste the URL you copied, and press Enter.
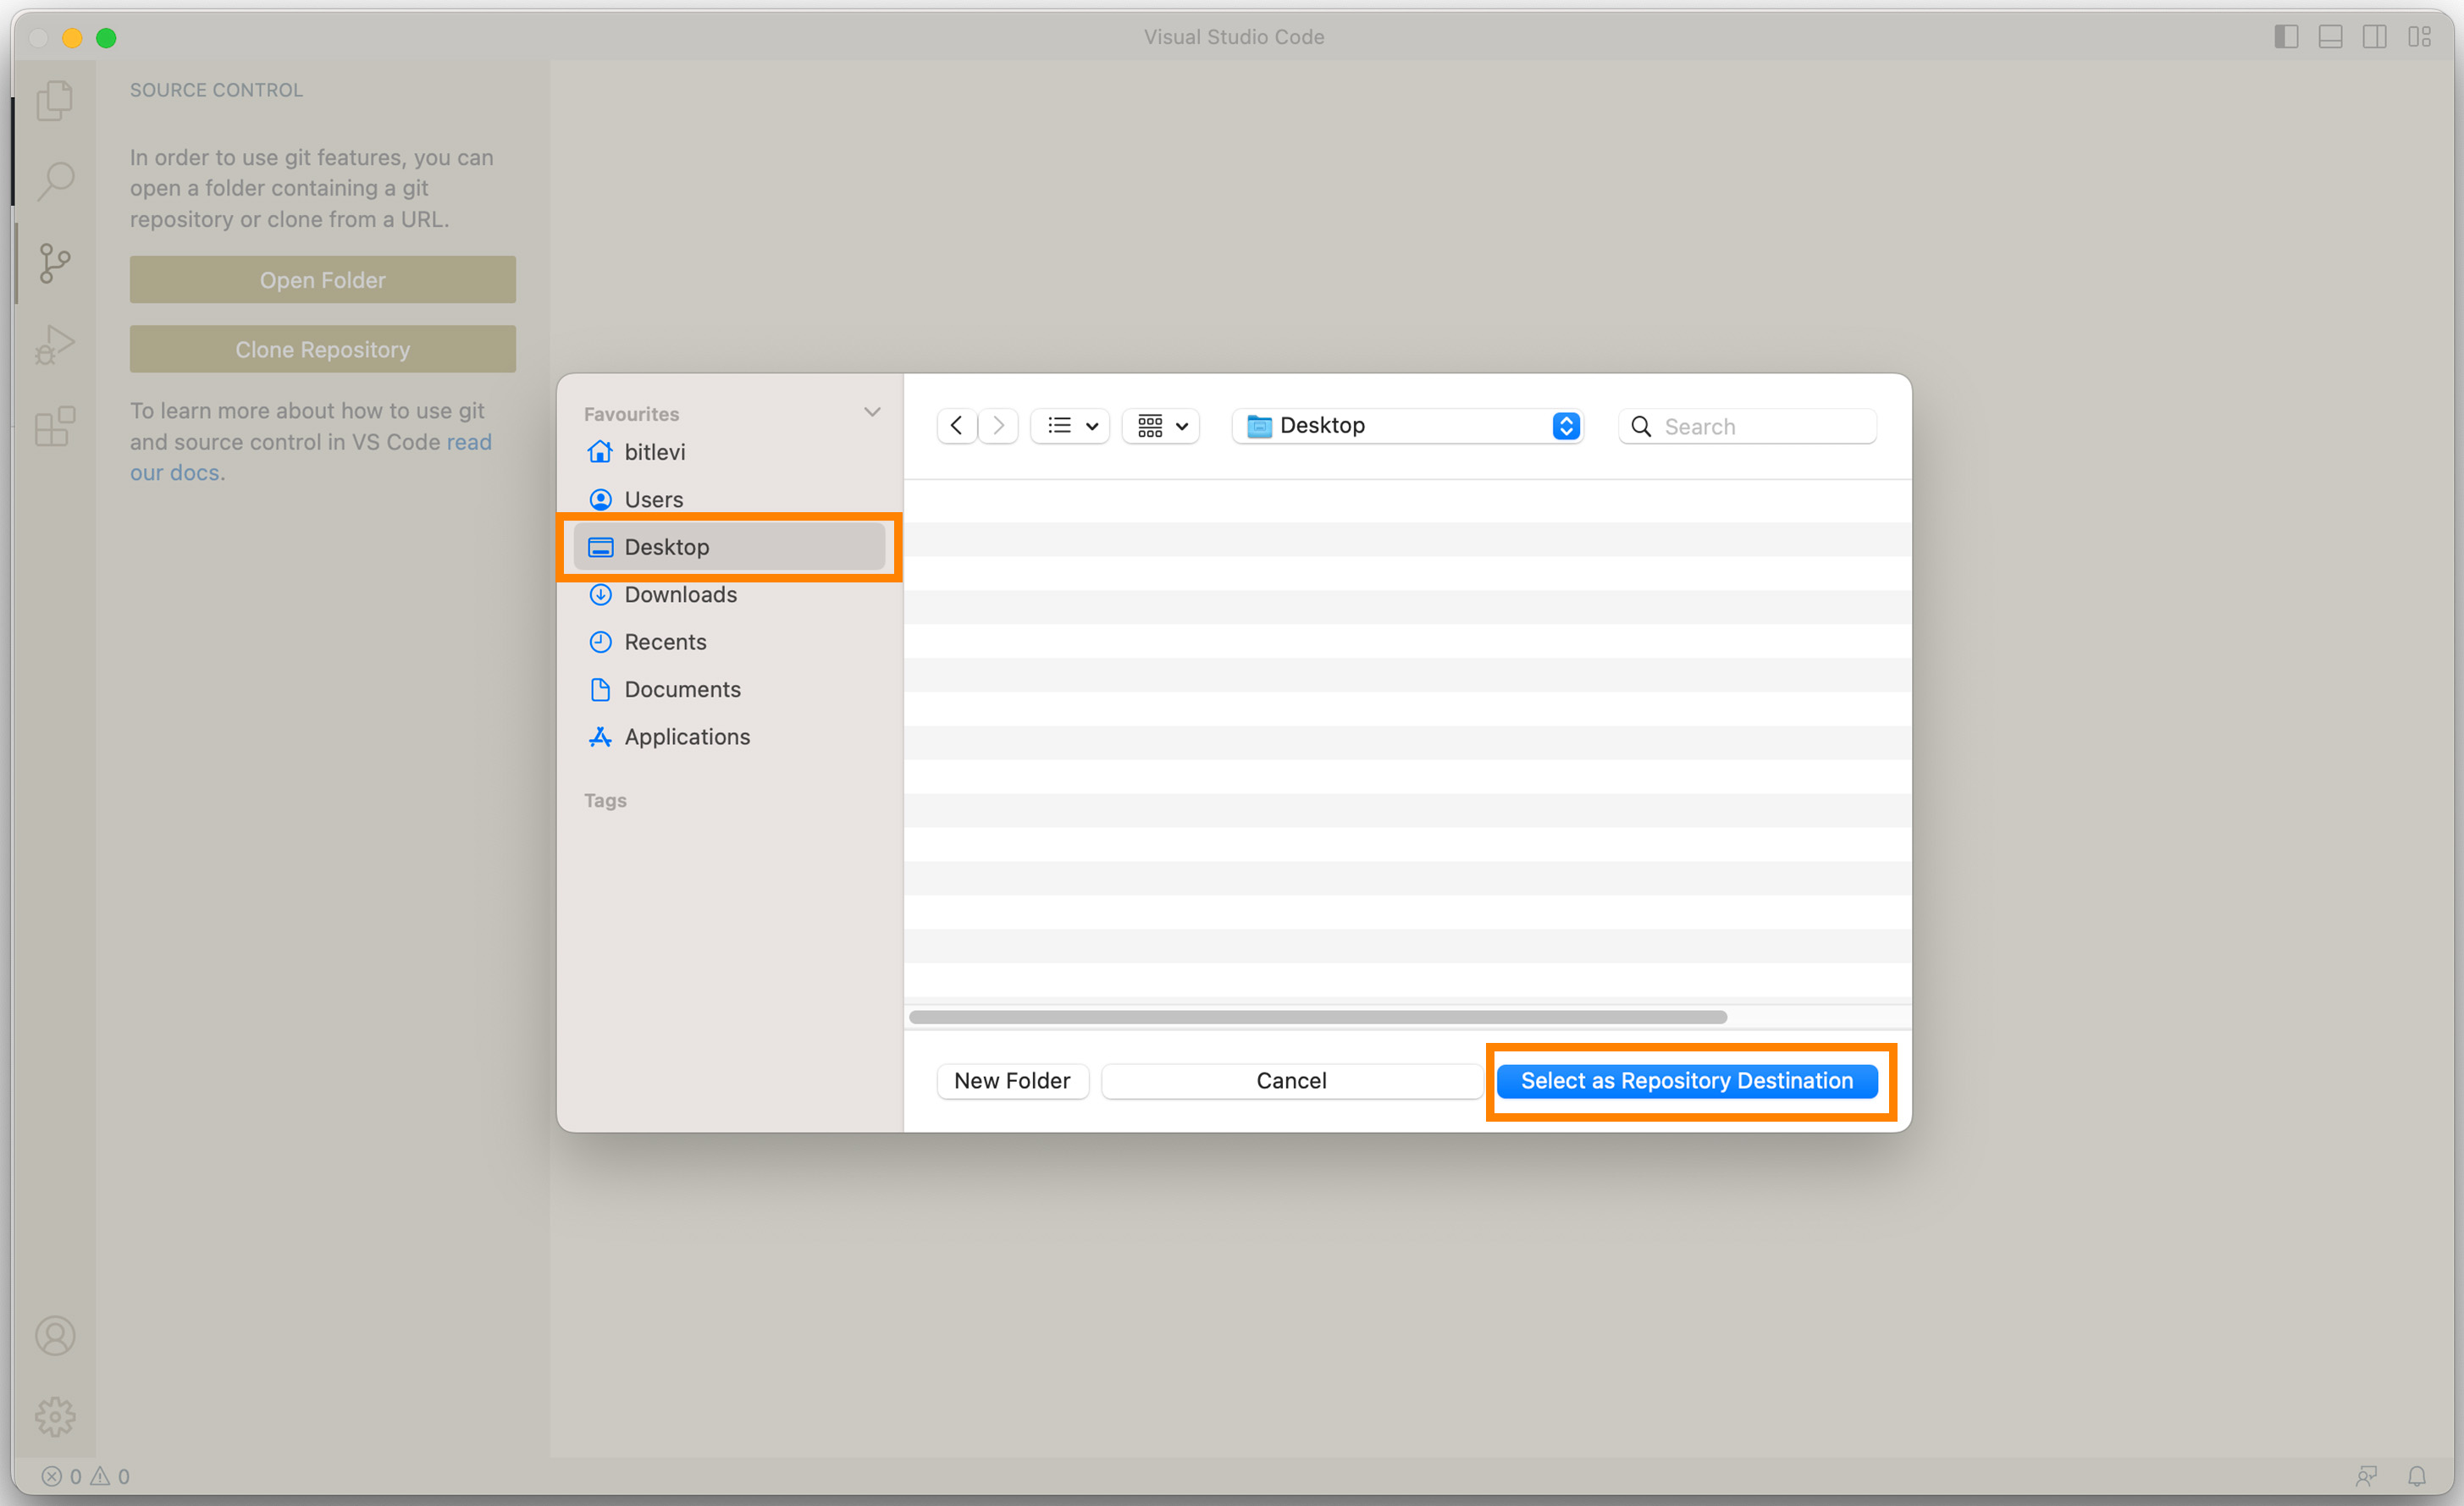
- When asked to select a directory, navigate to your desktop and click “Select Repository Location”.
Step 4: Creating a New Branch
Creating a new branch for your changes is a good practice in collaborative projects, including Open Source. Working on a different branch allows you to isolate your changes from the main project (often called the “main” or “master” branch).
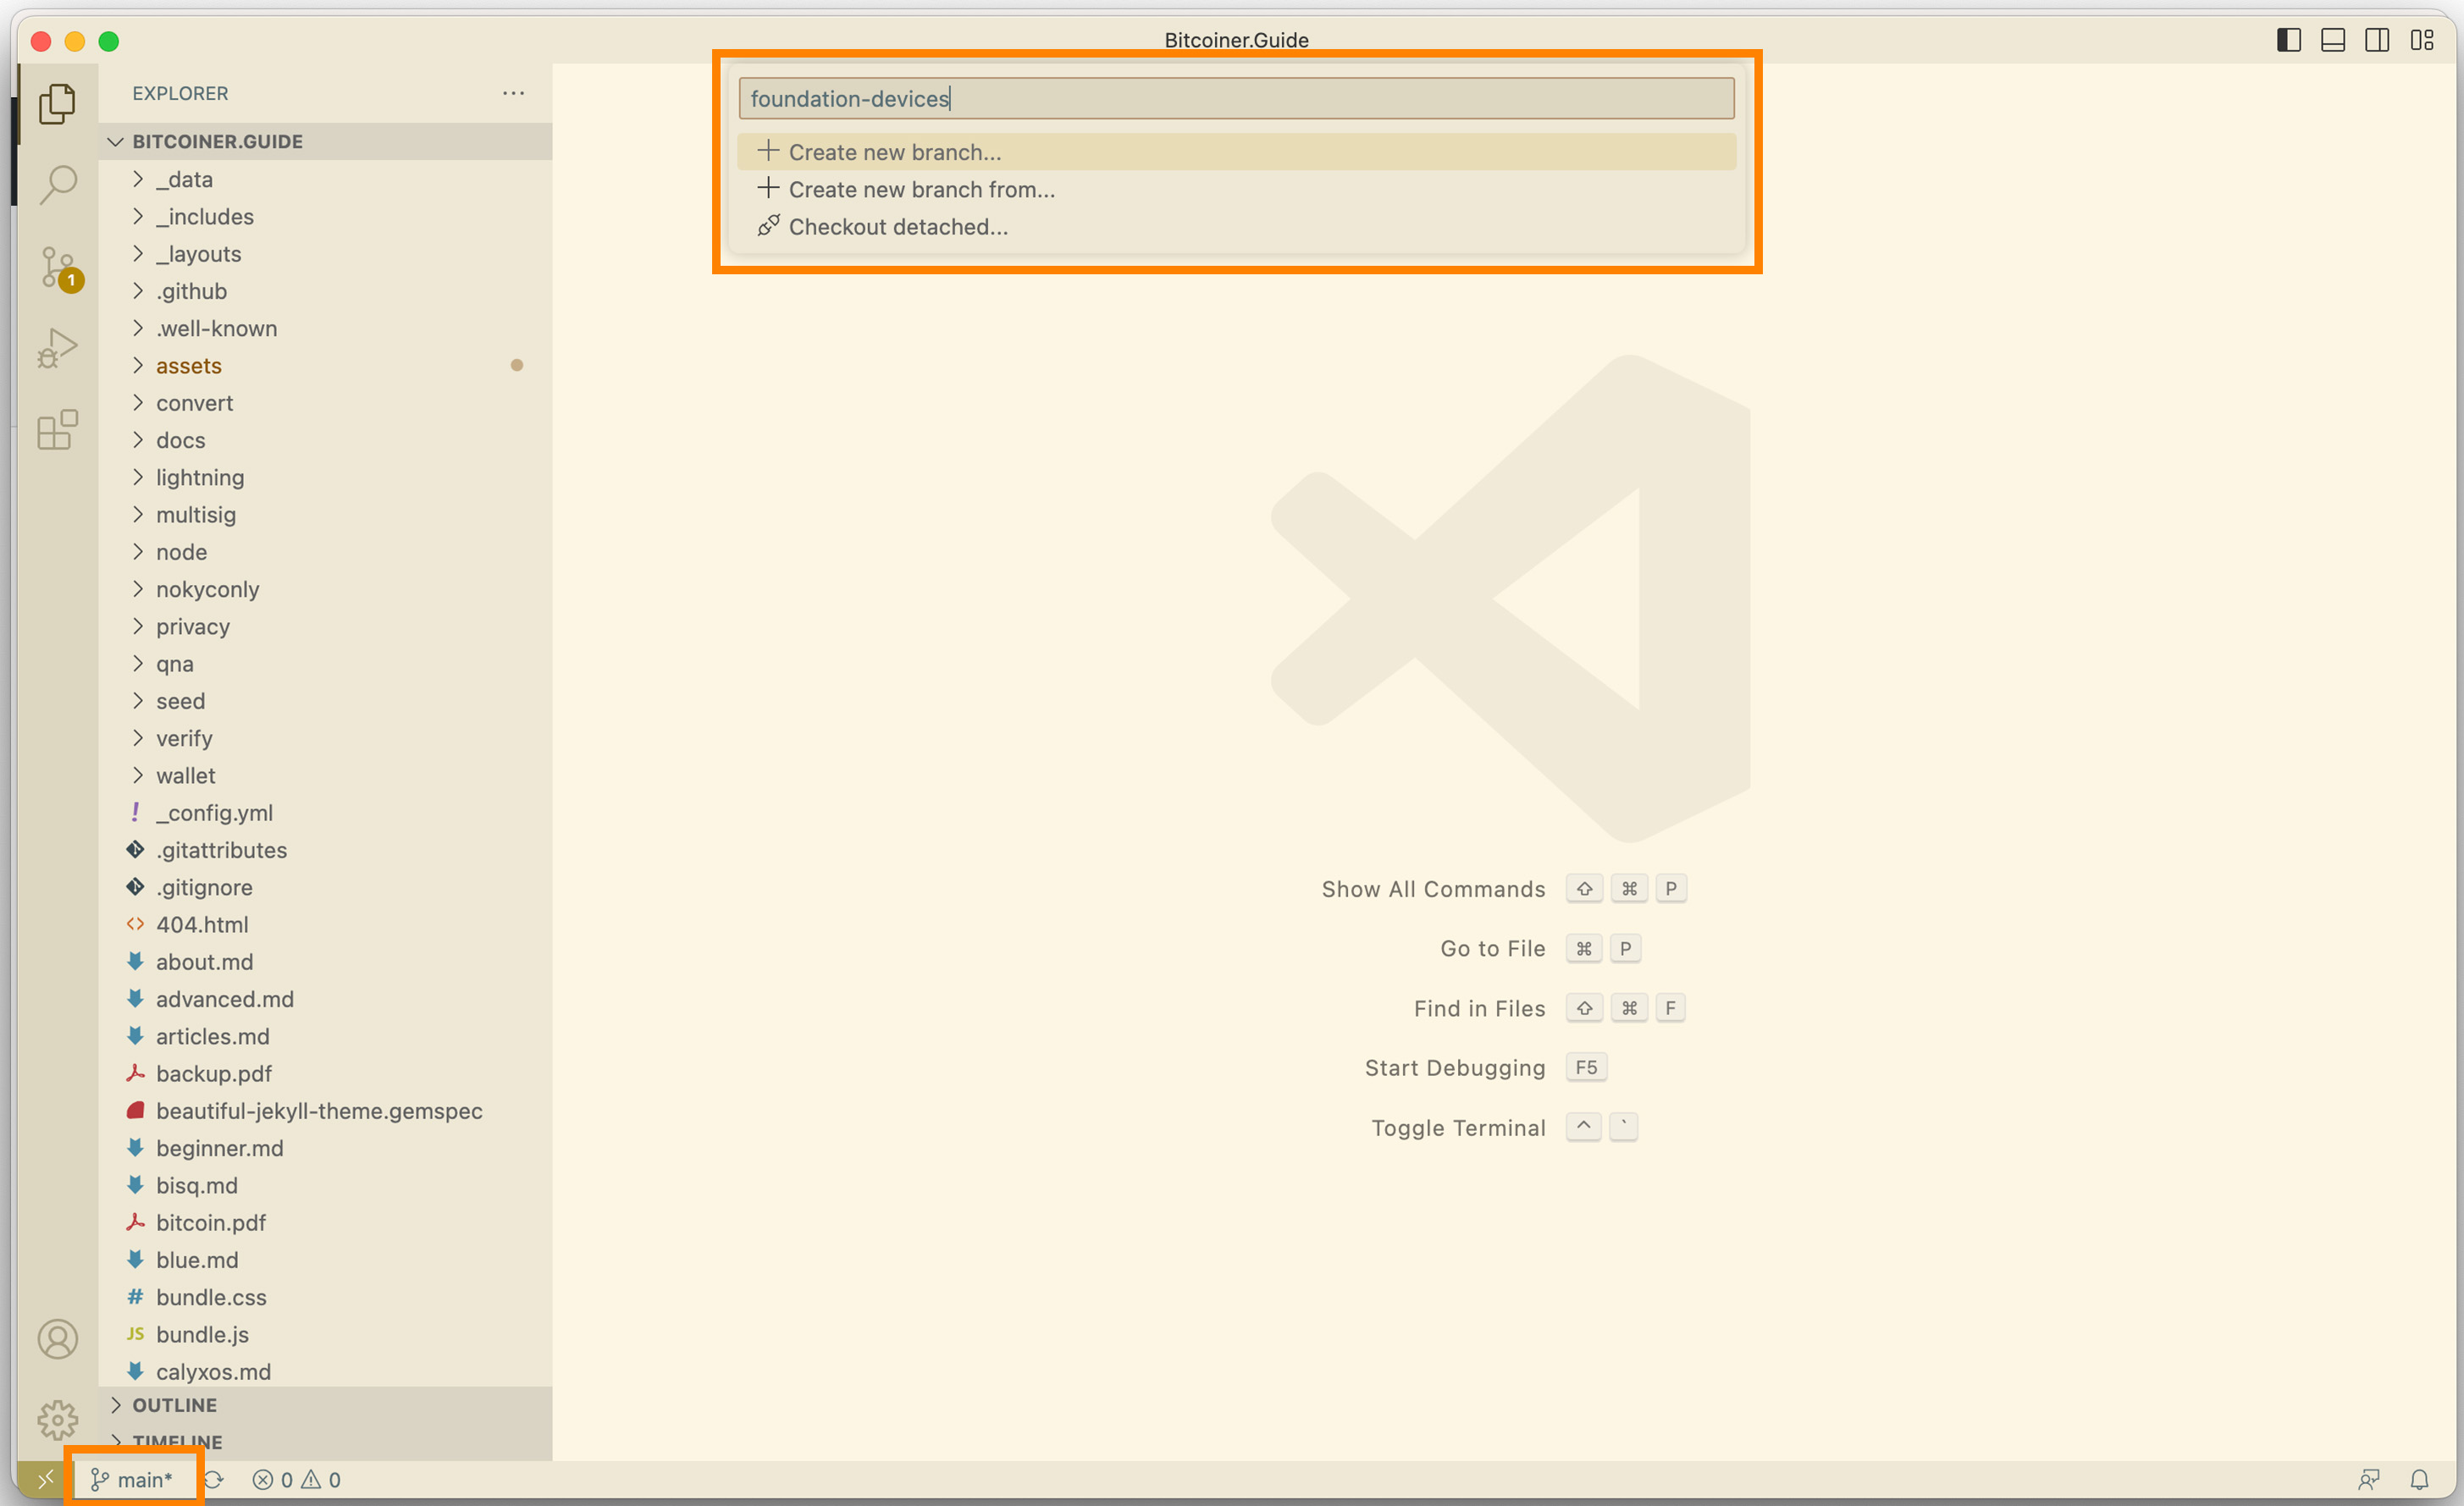
- Click on the branch name at the bottom left of the screen (it should be
masterormain). - In the dialog box that pops up, select
Create new branch. - Enter a name for your new branch, such as “foundation-devices”, and press Enter.
You can switch back to the main branch at any time by clicking on the branch name at the bottom left and selecting the main branch from the list.
Step 5: Set Up the Project Locally
Let’s run Bitcoiner.Guide on your computer.
- Open the terminal in Visual Studio Code (View -> Terminal).
- Run
bundle installto install the necessary Ruby gems for the project. - Run
bundle exec jekyll serveto start a local server. - When running the site locally, you can view it at http://localhost:4000.
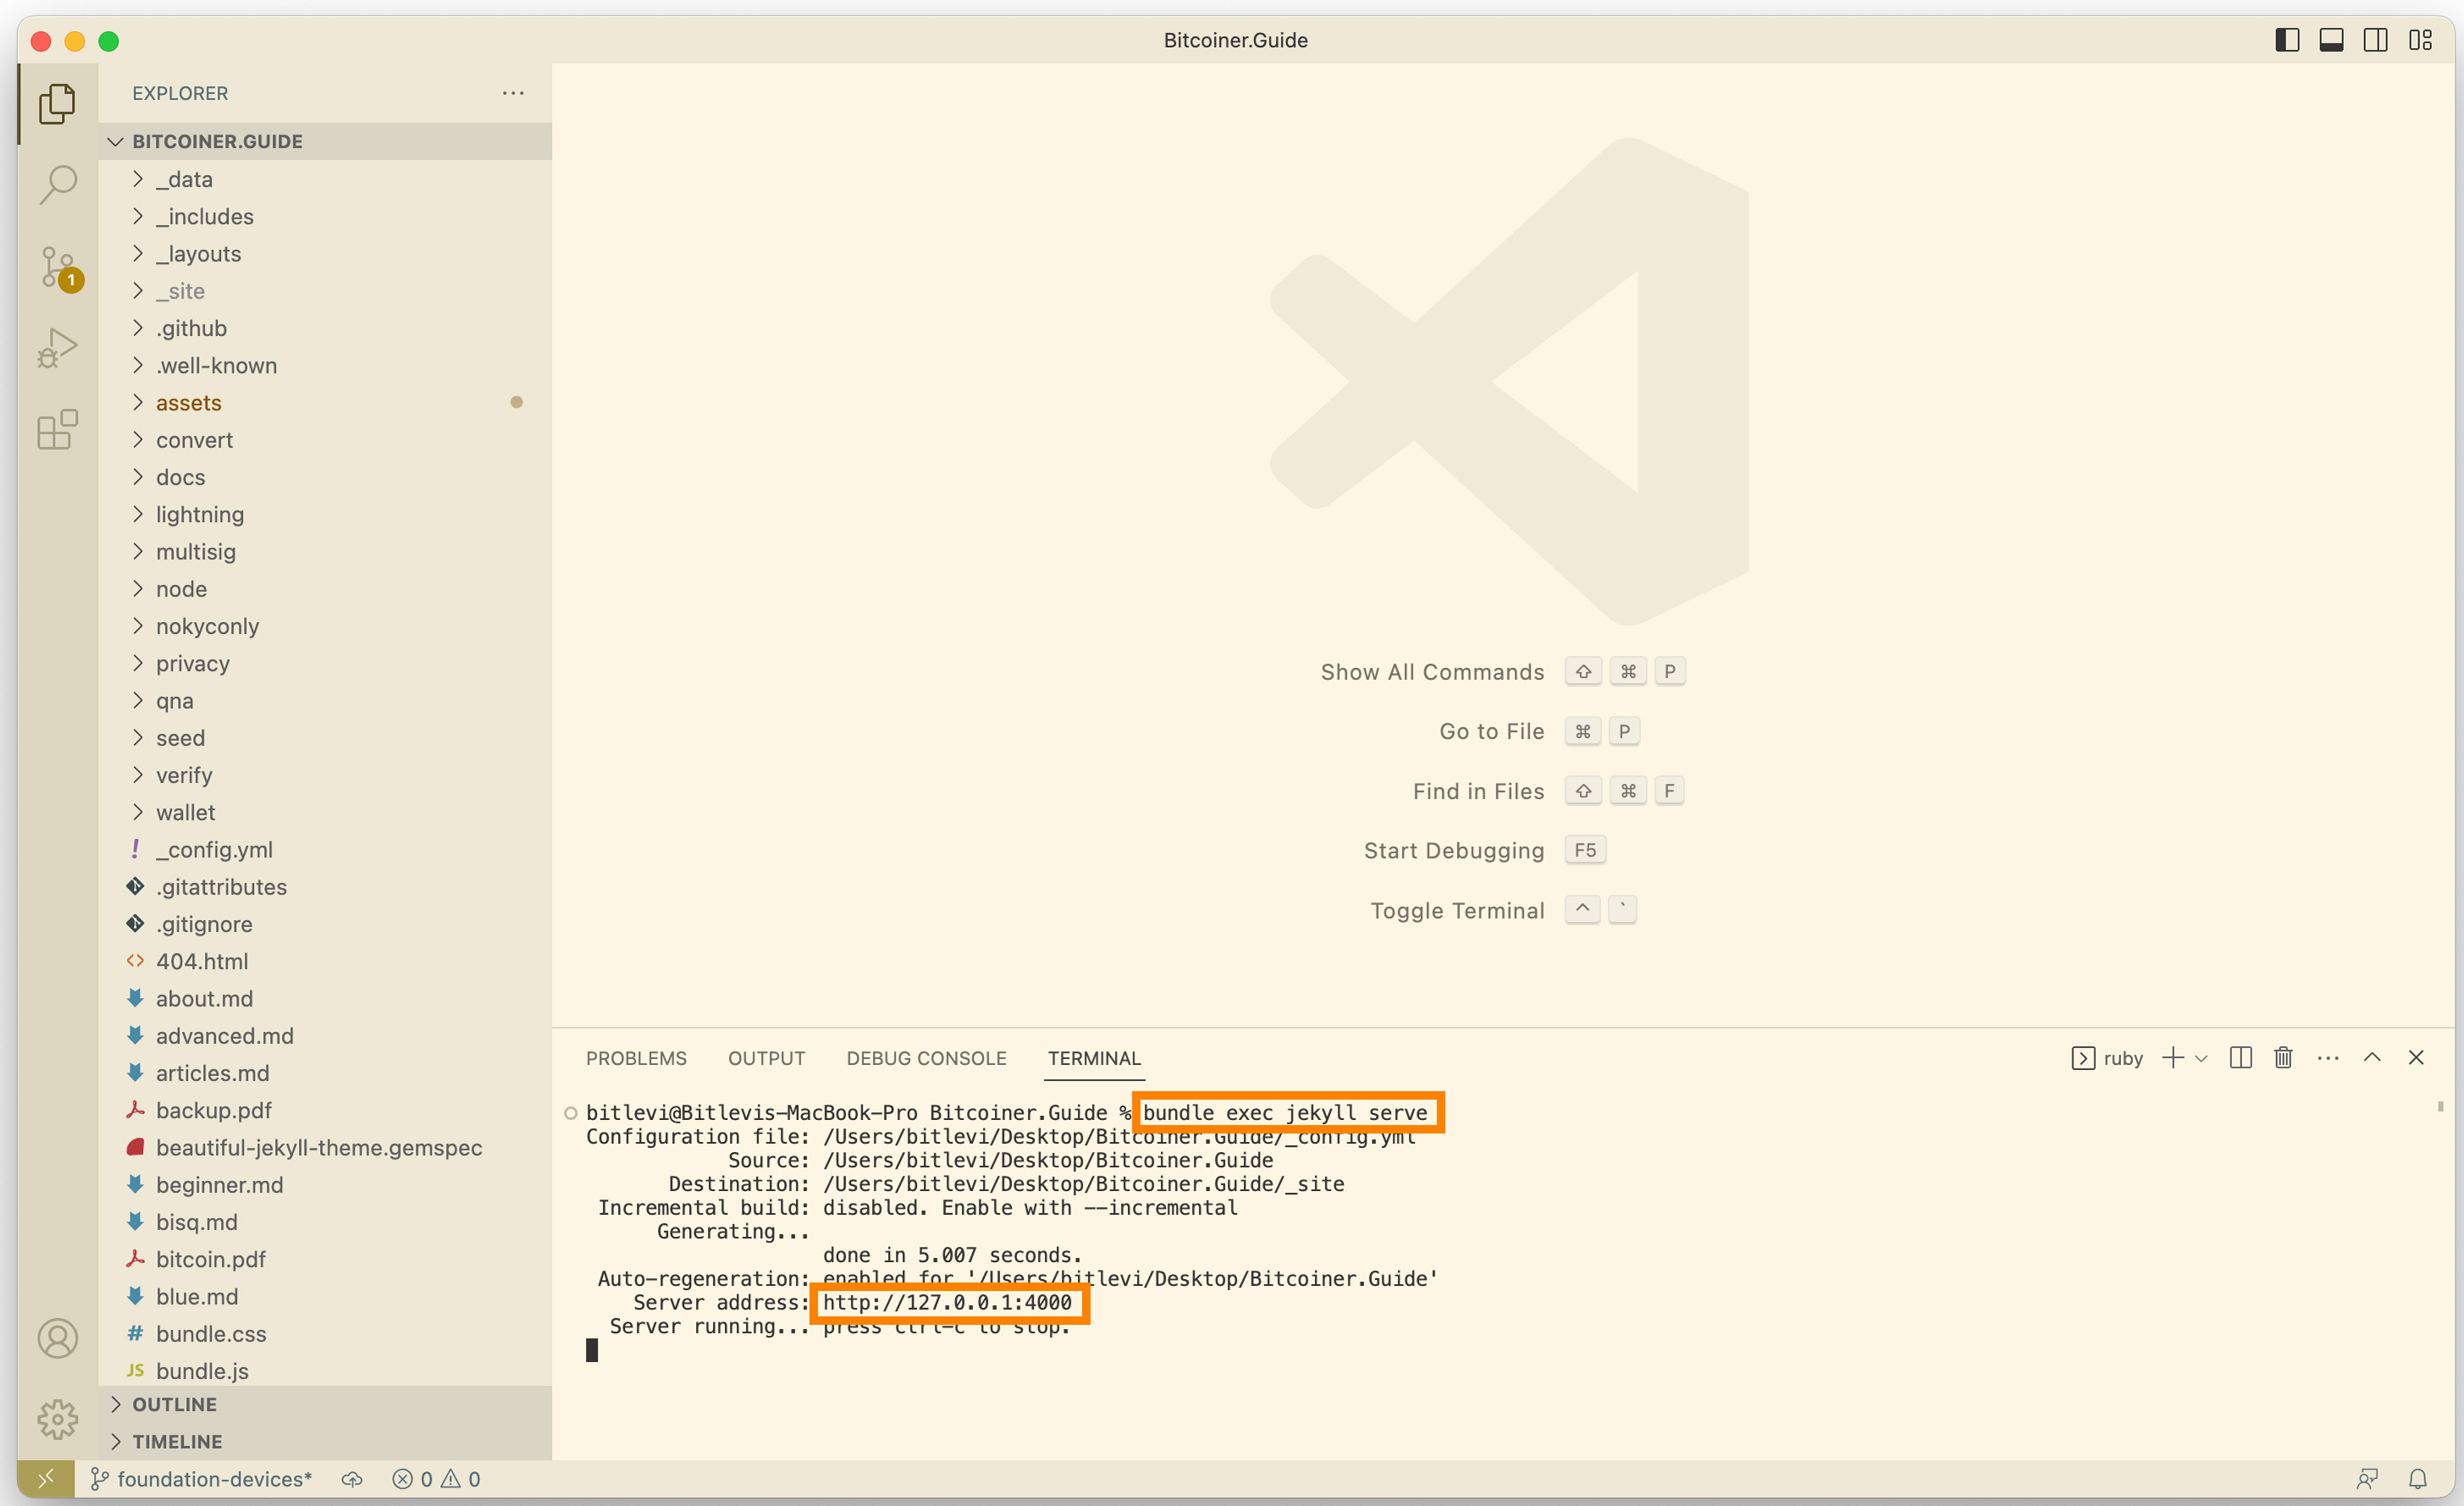
Note that if you have already installed bundle, you only need to run bundle exec jekyll serve
Step 6: Making Changes and Committing Them
It’s time to modify the project. We will add a new article called “Foundation Devices”:
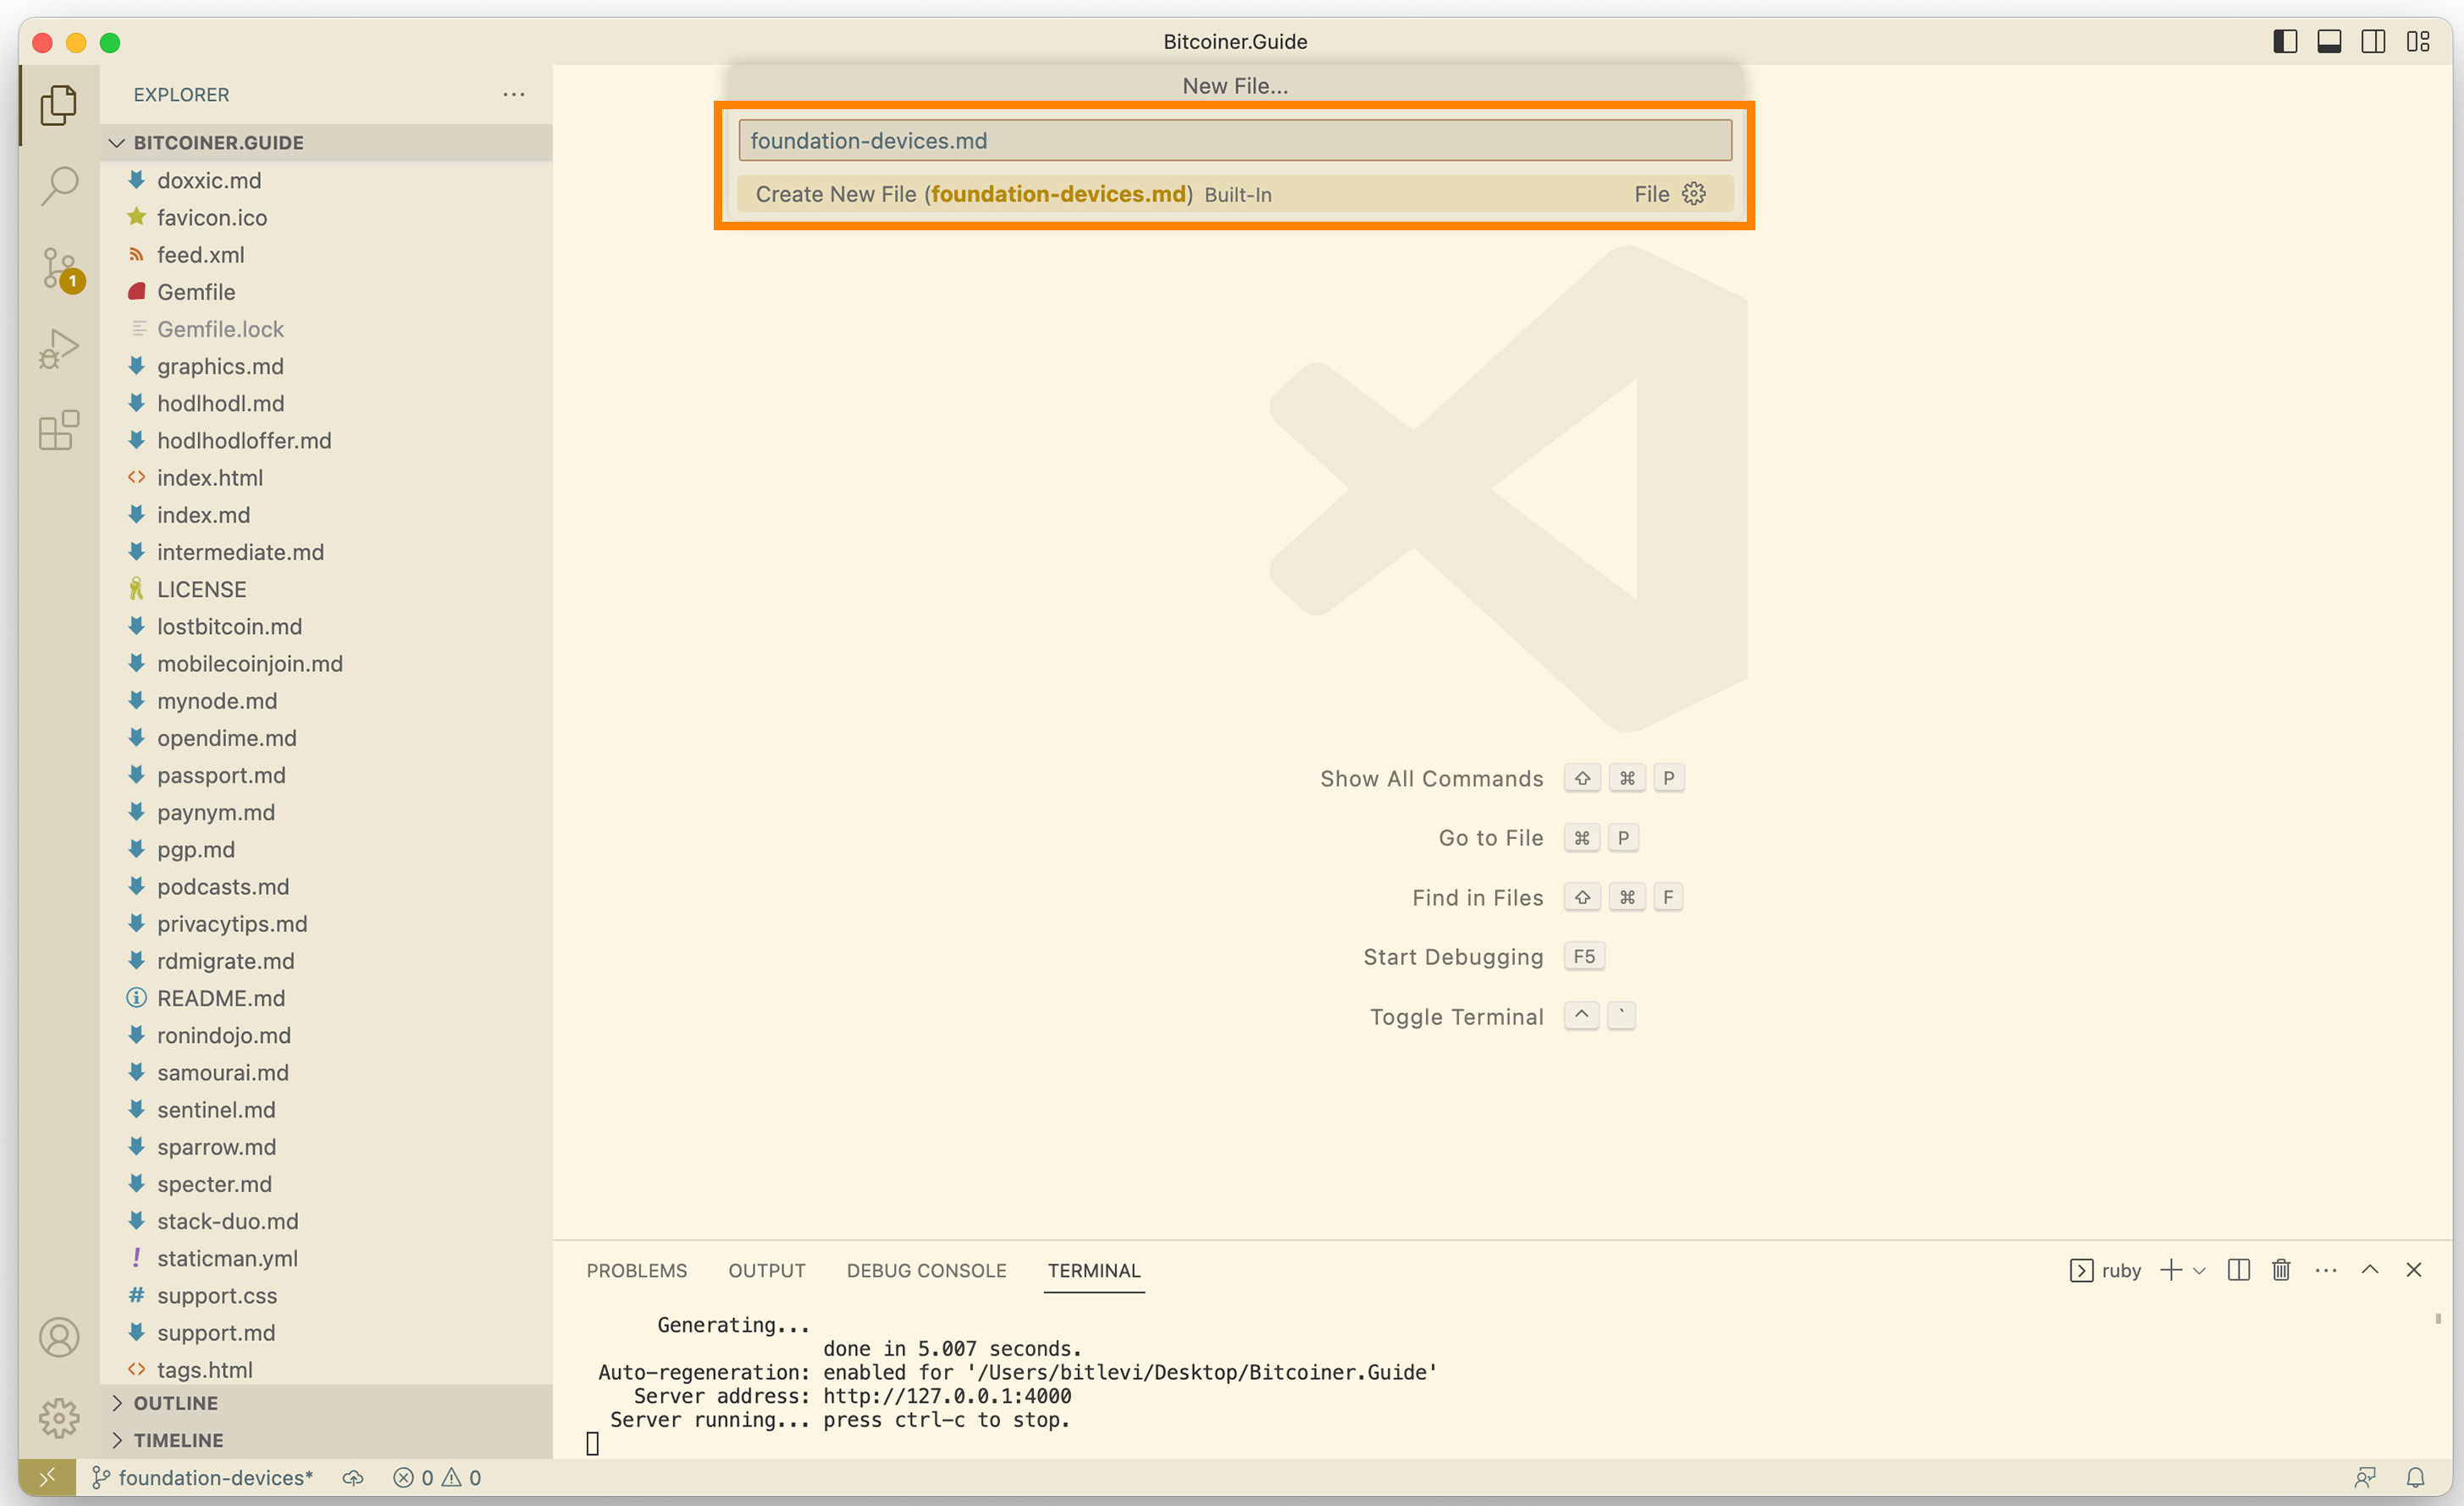
- In Visual Studio Code, create a new file with the format:
foundation-devices.md.
- At the top of the file, add the following metadata:
---
layout: page
title: Foundation Devices
subtitle: Sovereign computing company
---
- Start writing your article below the metadata. For example:
Foundation Devices is a hardware company that builds Bitcoin-centric tools that empower you to reclaim your digital sovereignty. They aimed to build a different kind of hardware company with an emphasis on Open Source and local manufacturing. This starts with Passport and Envoy – but they are just getting started!
Articles on Bitcoiner.Guide use Markdown Formatting. Markdown is a lightweight markup language for creating formatted text. If you want to learn how to bold text, create lists and more, here is an excellent guide.
To include images in your article:
- First, upload the image to the
assets > imgdirectory in your project.
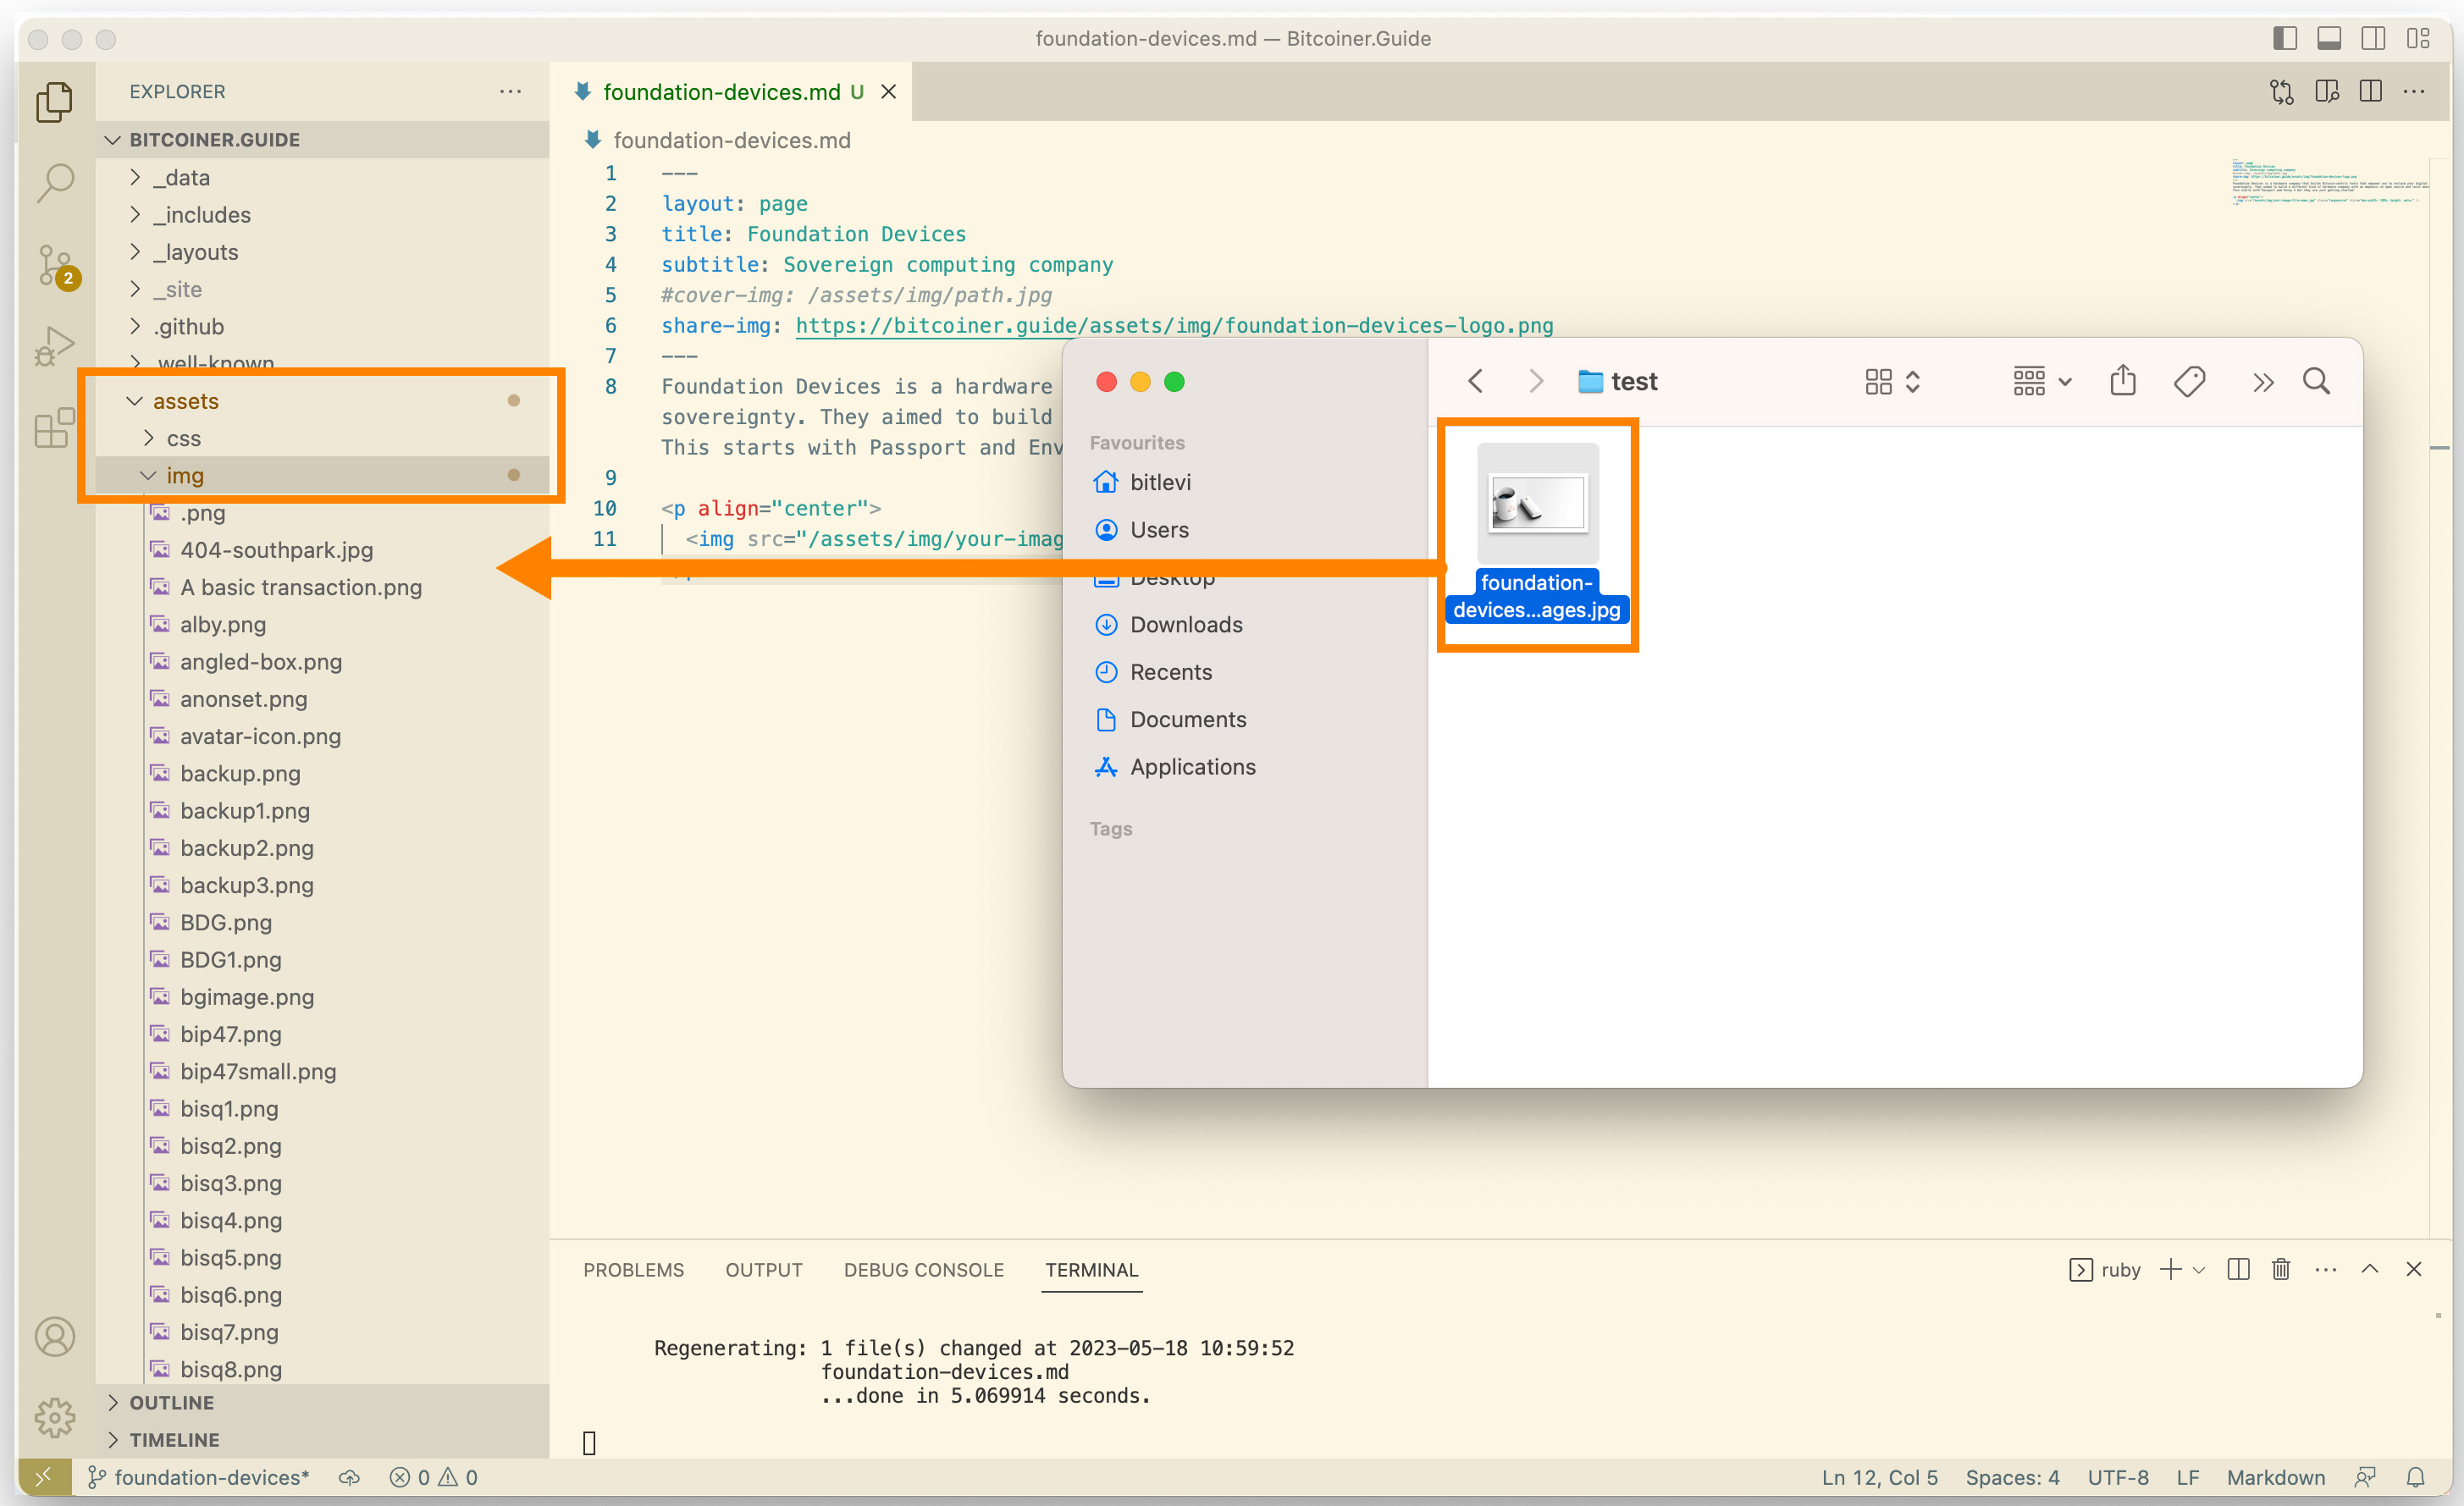
- You can then use the following syntax to include images:
<p align="center">
  <img src="/assets/img/your-image-file-name.jpg" class="responsive" style="max-width: 100%; height: auto;" />
</p>
- Replace
your-image-file-name.jpgwith the name of your image file. - Save the file with
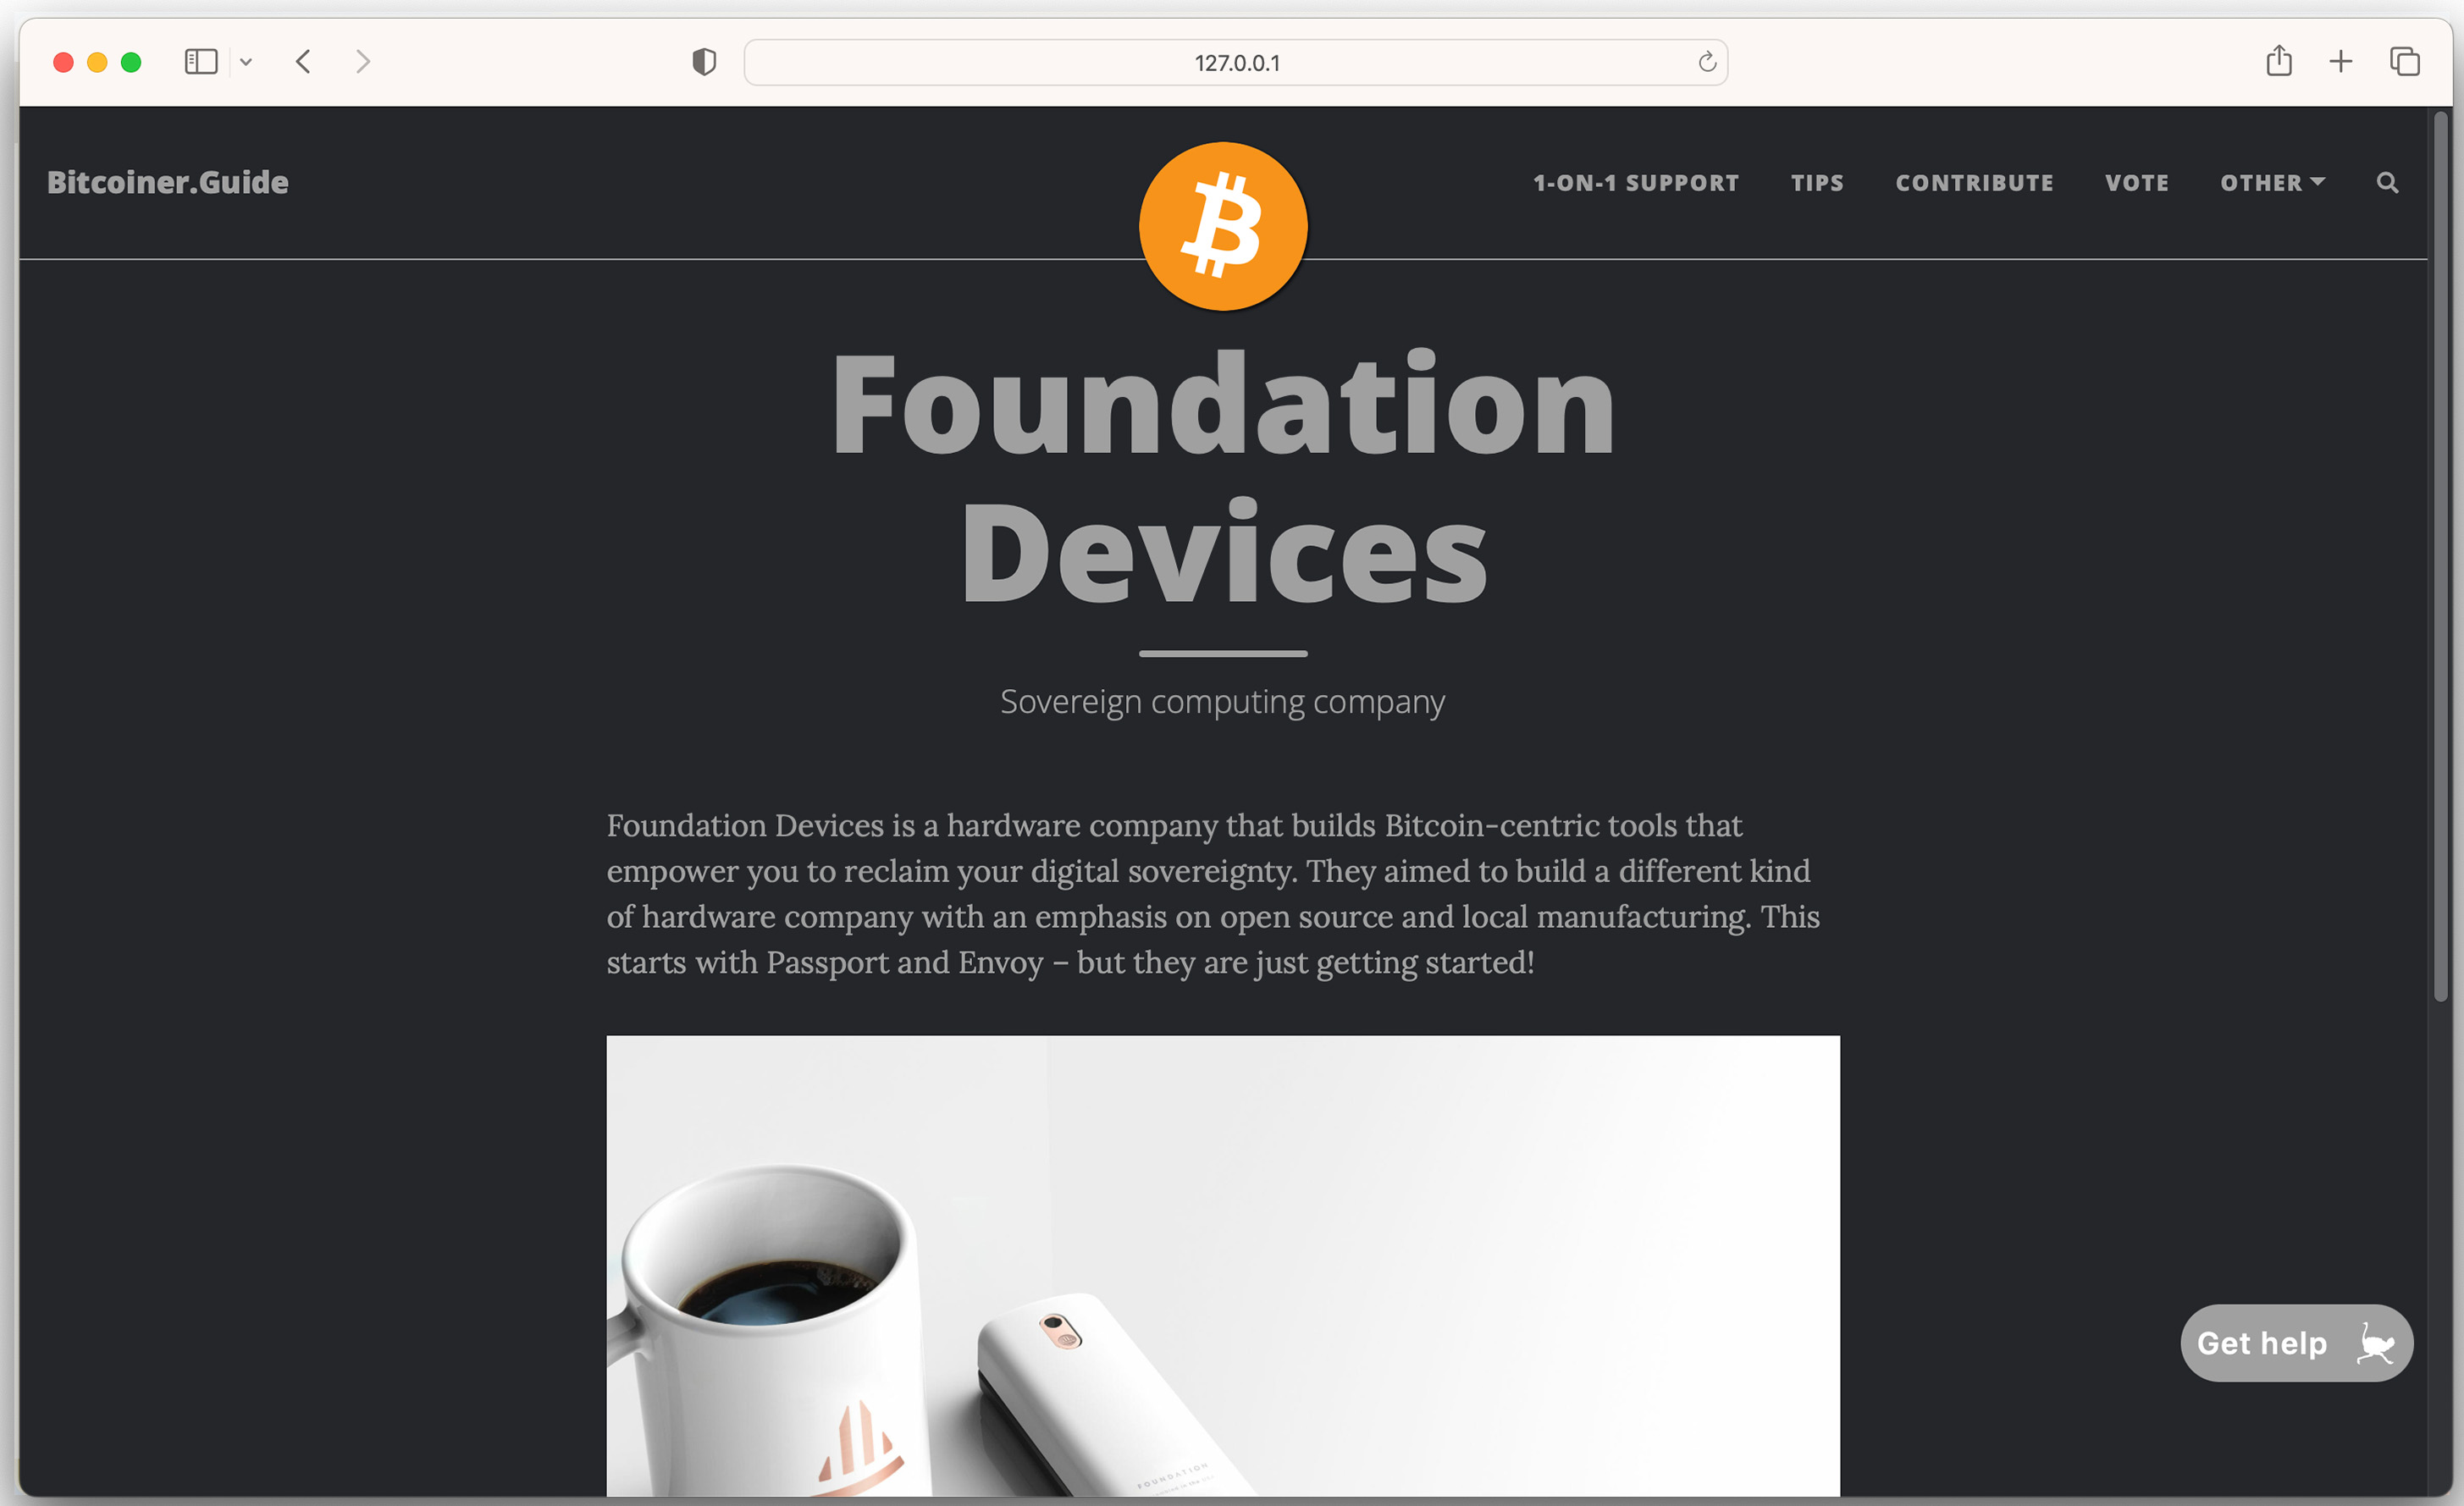
CMD+SorCTRL+S. - In your browser, navigate to
http://localhost:4000/foundation-devices(when running the site locally).
We have transformed this:
---
layout: page
title: Foundation Devices
subtitle: Sovereign computing company
---
Foundation Devices is a hardware company that builds Bitcoin-centric tools that empower you to reclaim your digital sovereignty. They aimed to build a different kind of hardware company with an emphasis on Open Source and local manufacturing. This starts with Passport and Envoy – but they are just getting started!

<p align="center">
  <img src="/assets/img/foundation-devices-images.jpg" class="responsive" style="max-width: 100%; height: auto;" />
</p>
Into:
Visit other .md articles in the project to get a better idea of how articles are built. It is important to respect the writing style of the project to keep things consistent.
Step 7: Pushing Your Changes to GitHub
Let’s save your changes and upload them to GitHub.
- Click on the source control icon on the left side of Visual Studio Code.
- You should see your changes in the “Changes” section. Click the “+” icon next to your files to stage your changes.
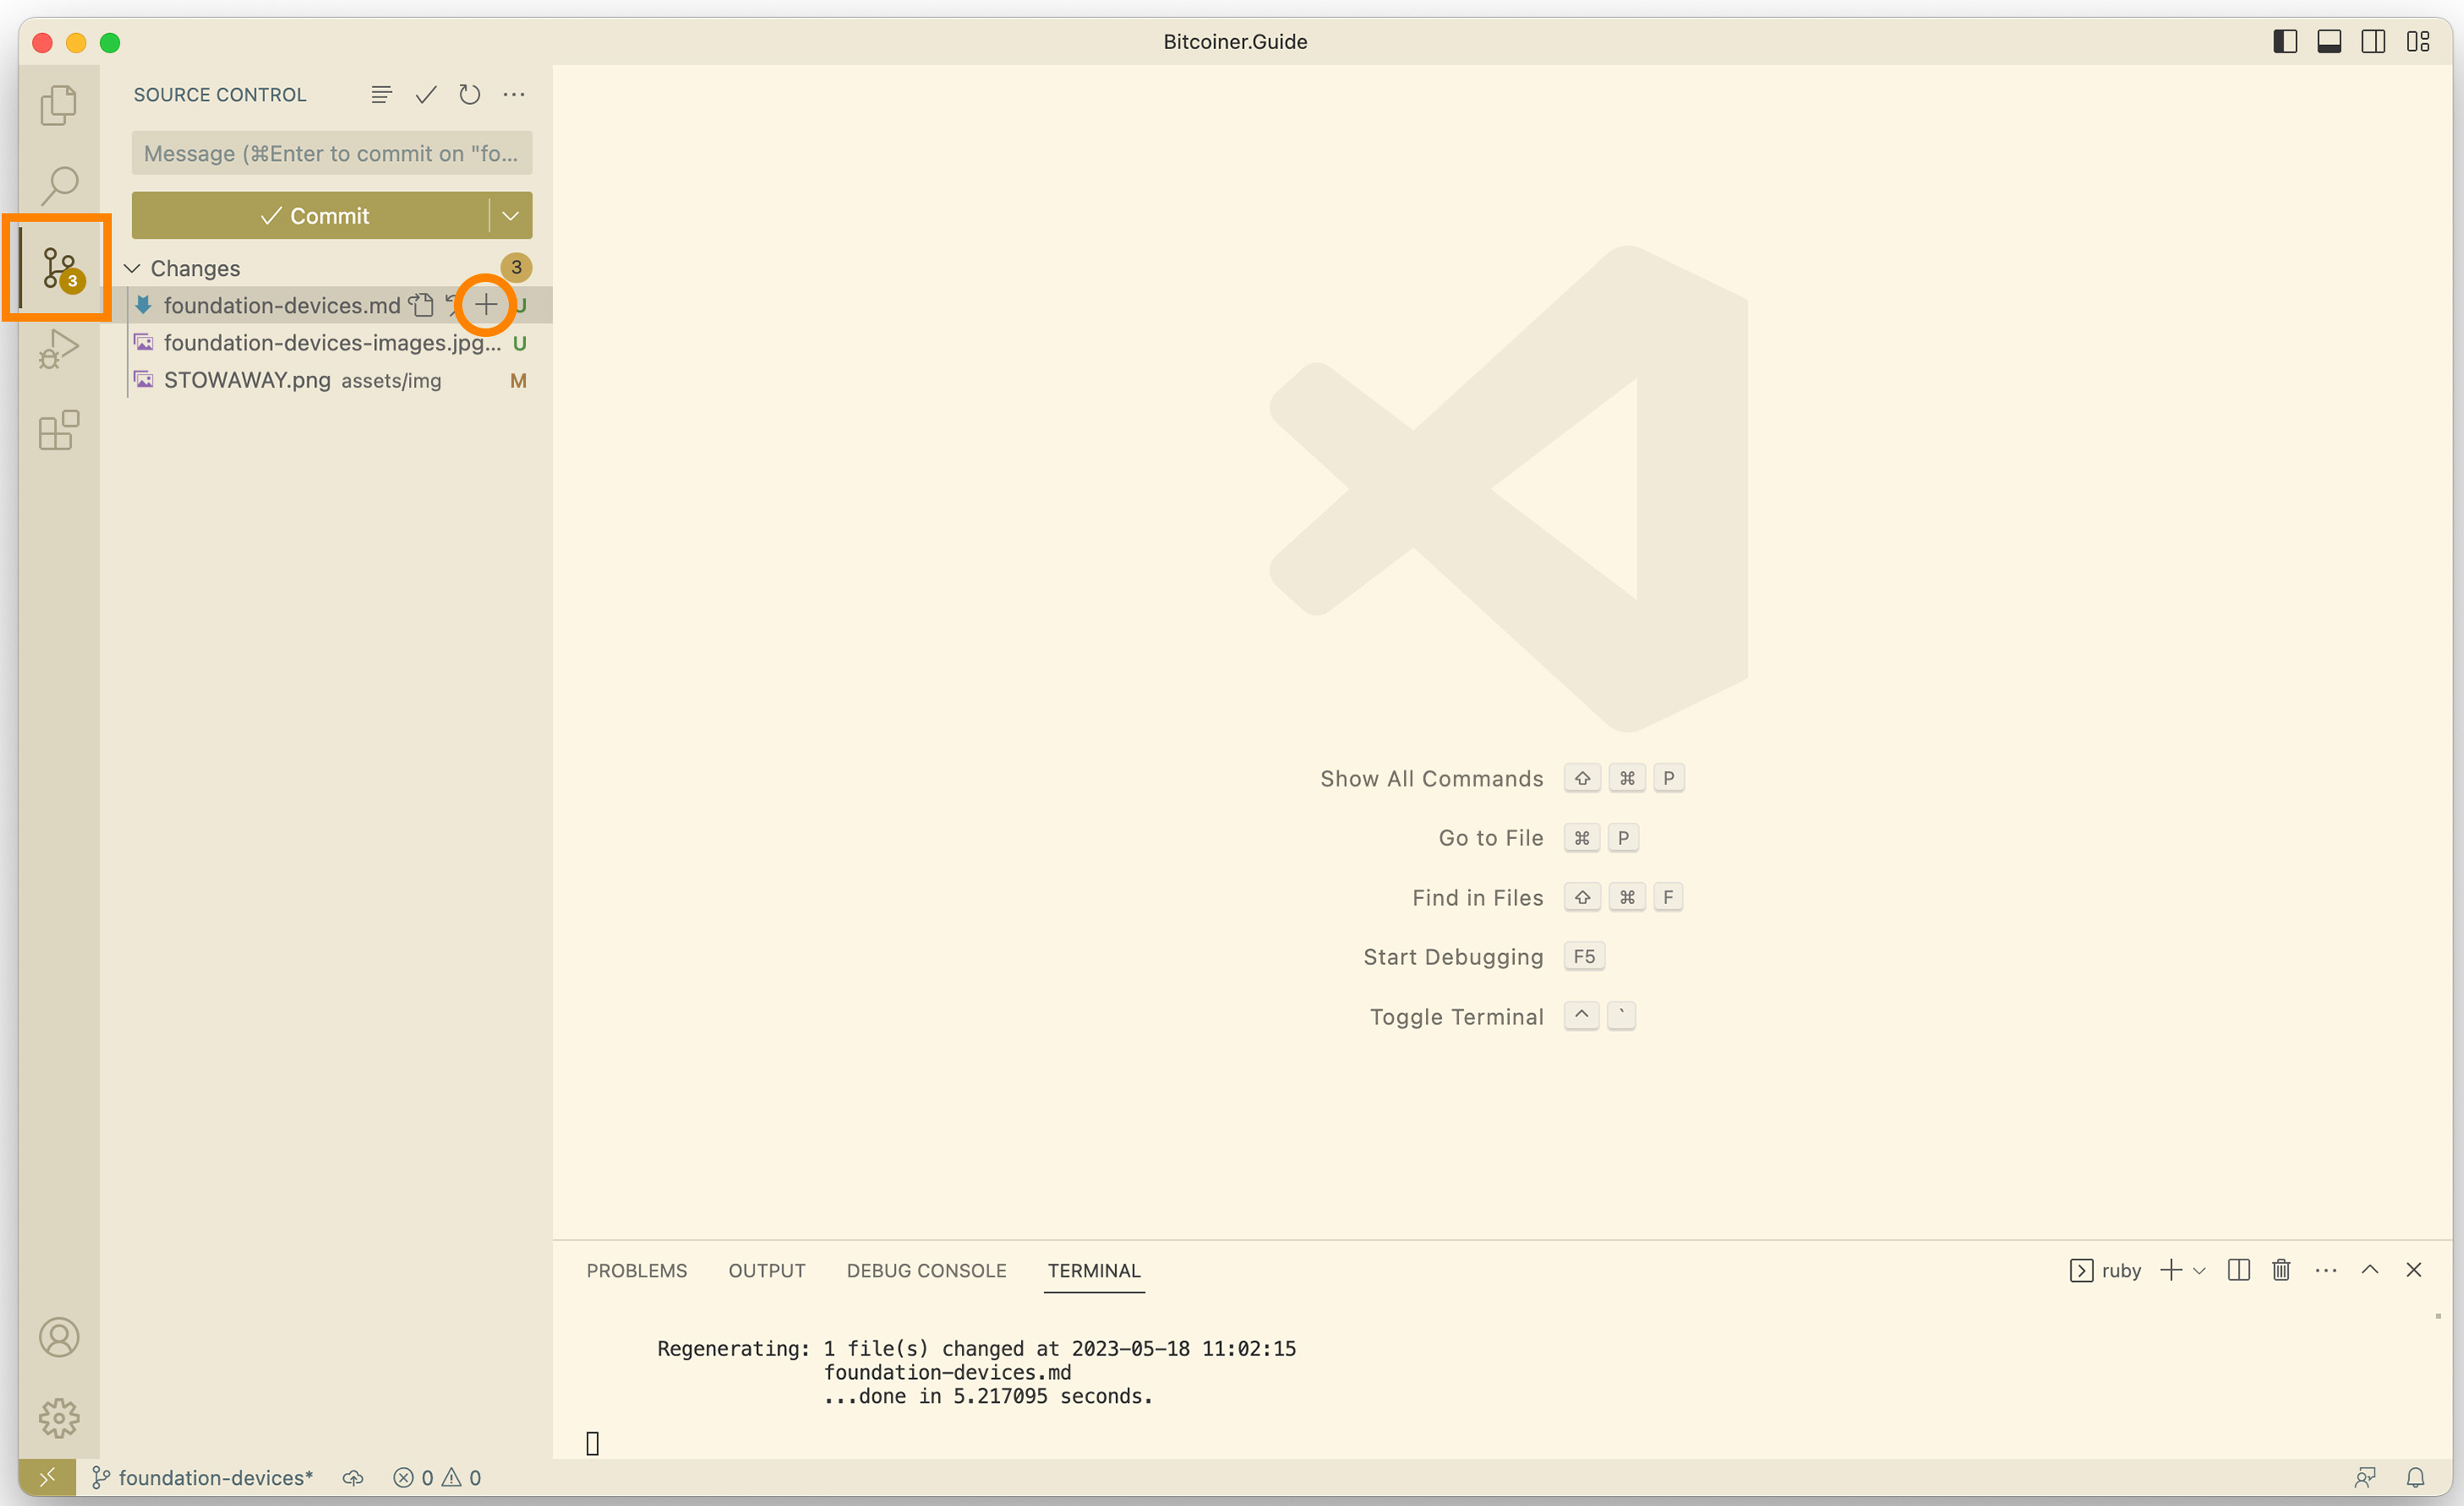
- Enter a commit message in the text box at the top, such as “Added Foundation Devices article”, and press
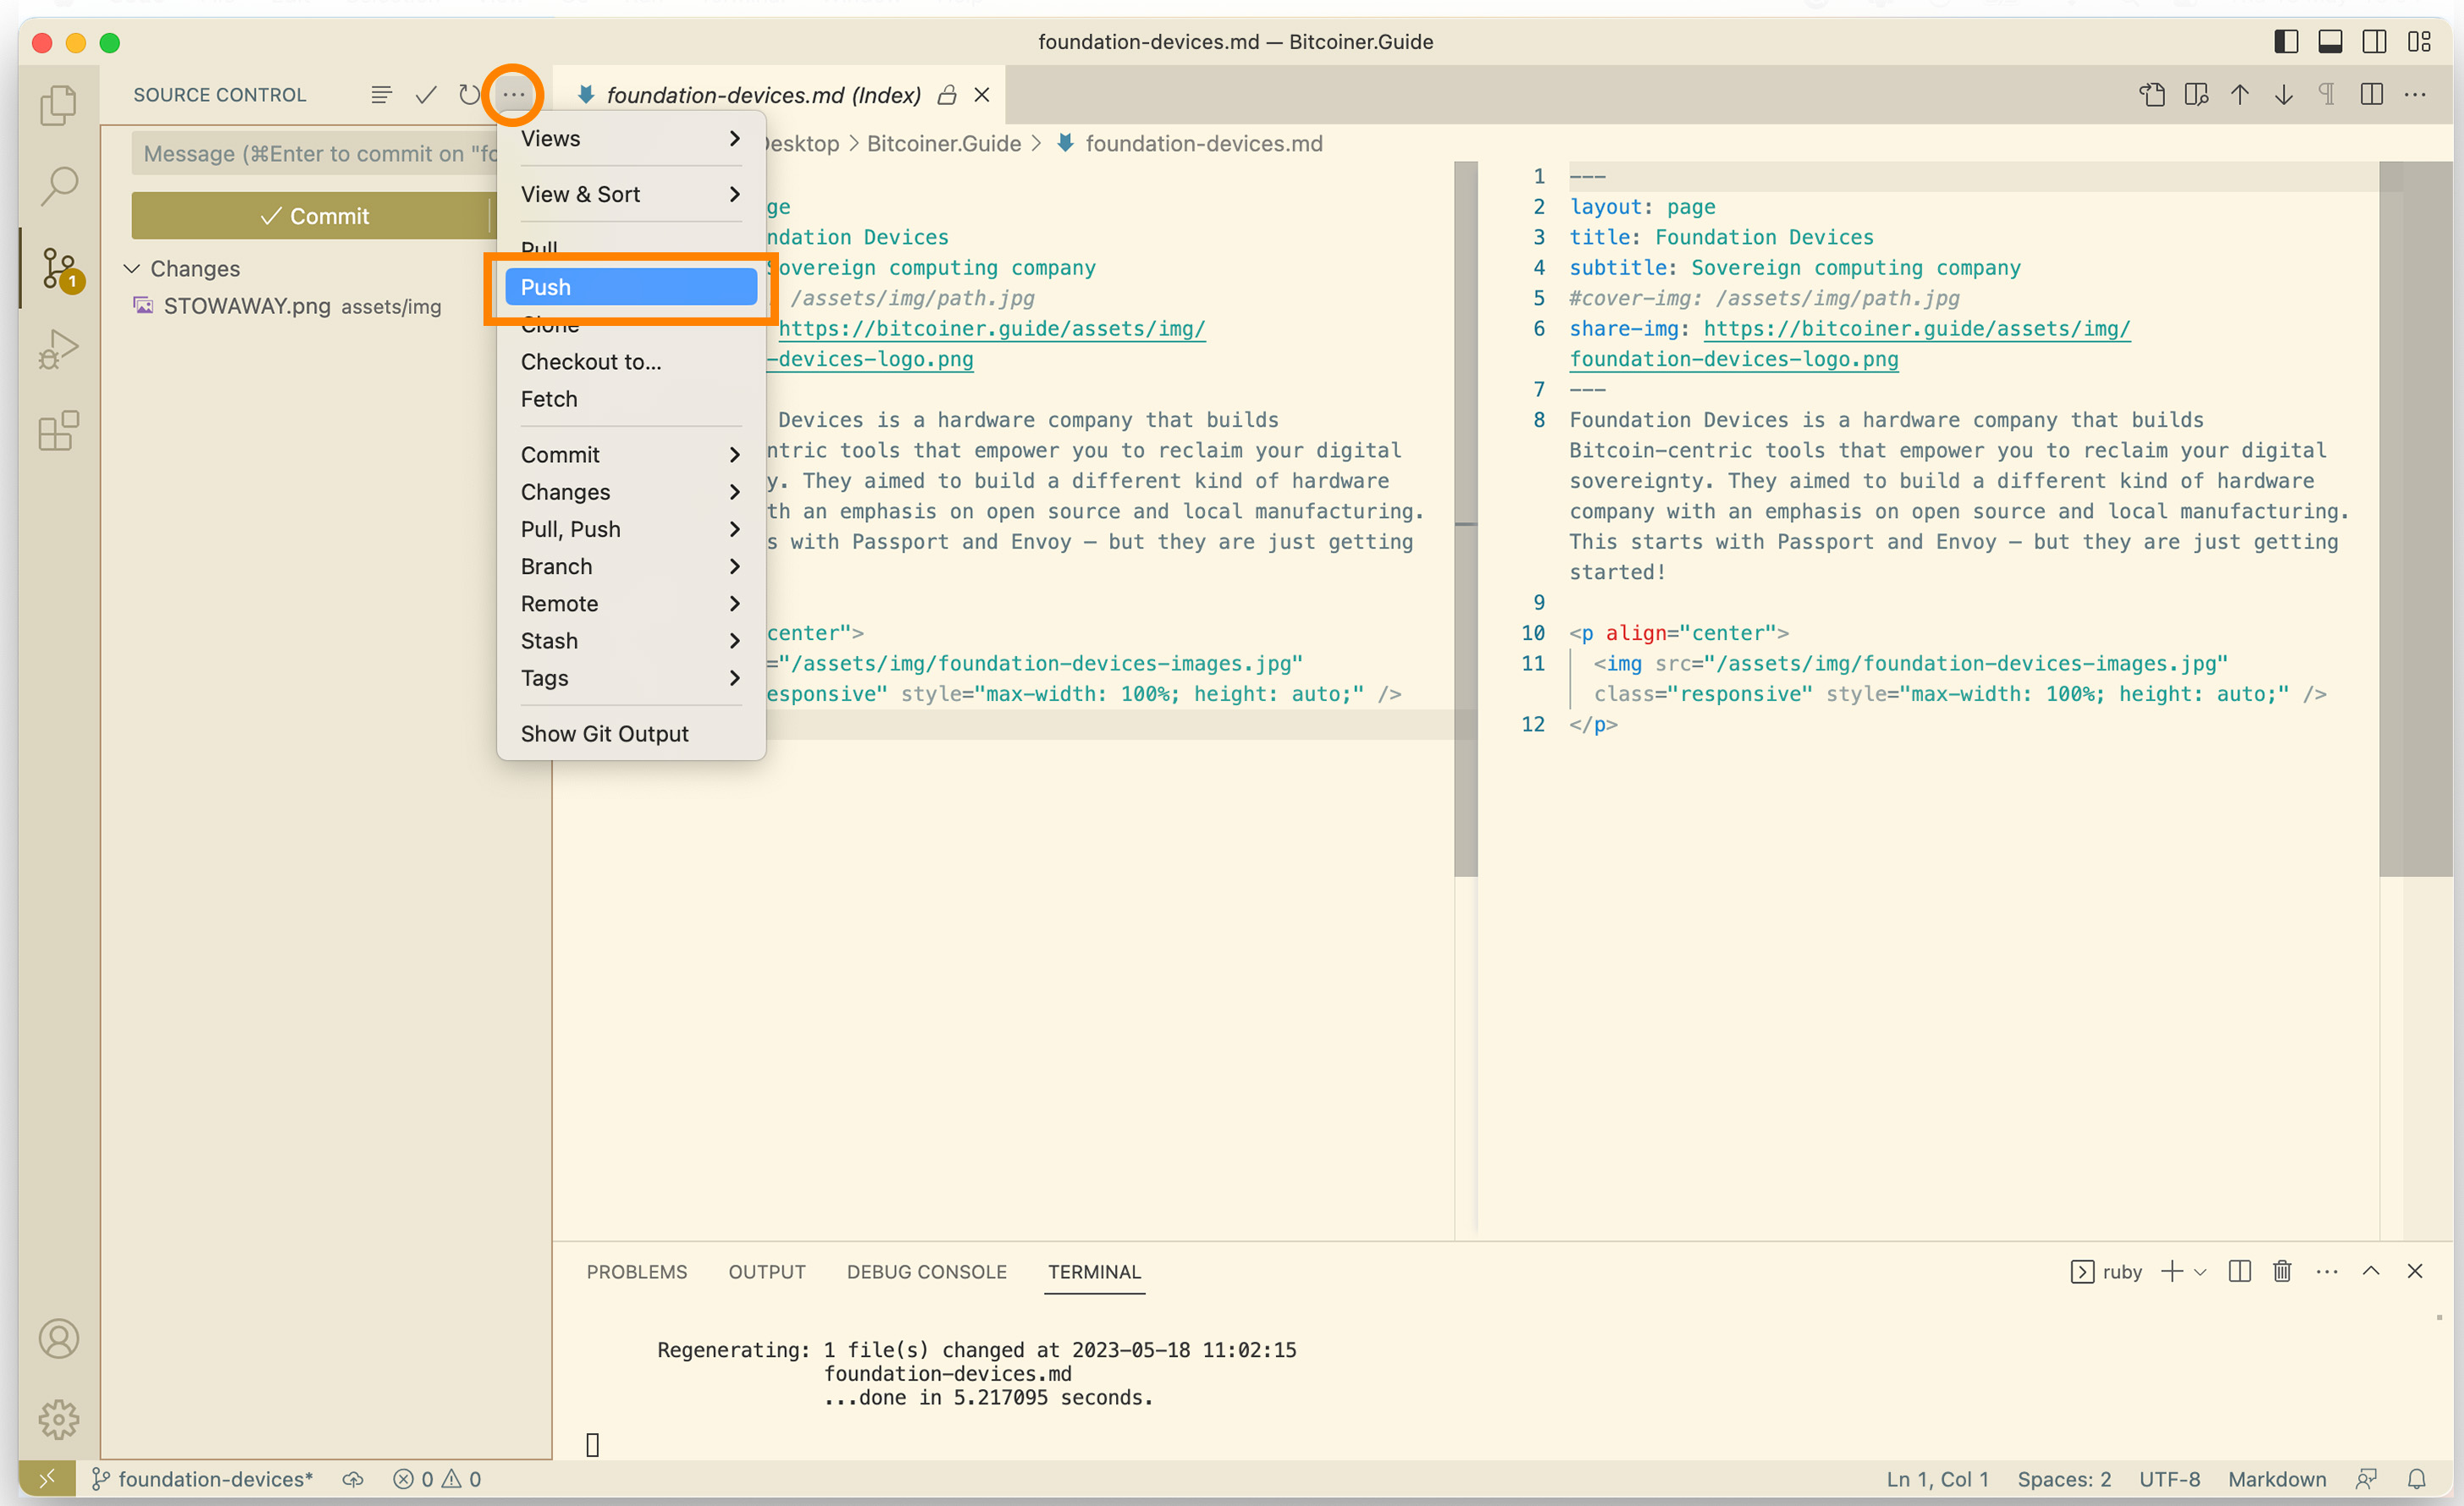
Ctrl+EnterorCmd+Enteron a Mac. - Click on the three dots at the top of the Source Control view and select “Push” to upload your changes to GitHub.

Step 8: Opening a Pull Request
Finally, let’s propose your changes to be incorporated into the original project:
- Go to https://github.com/YOUR_GITHUB_USERNAME/Bitcoiner.Guide
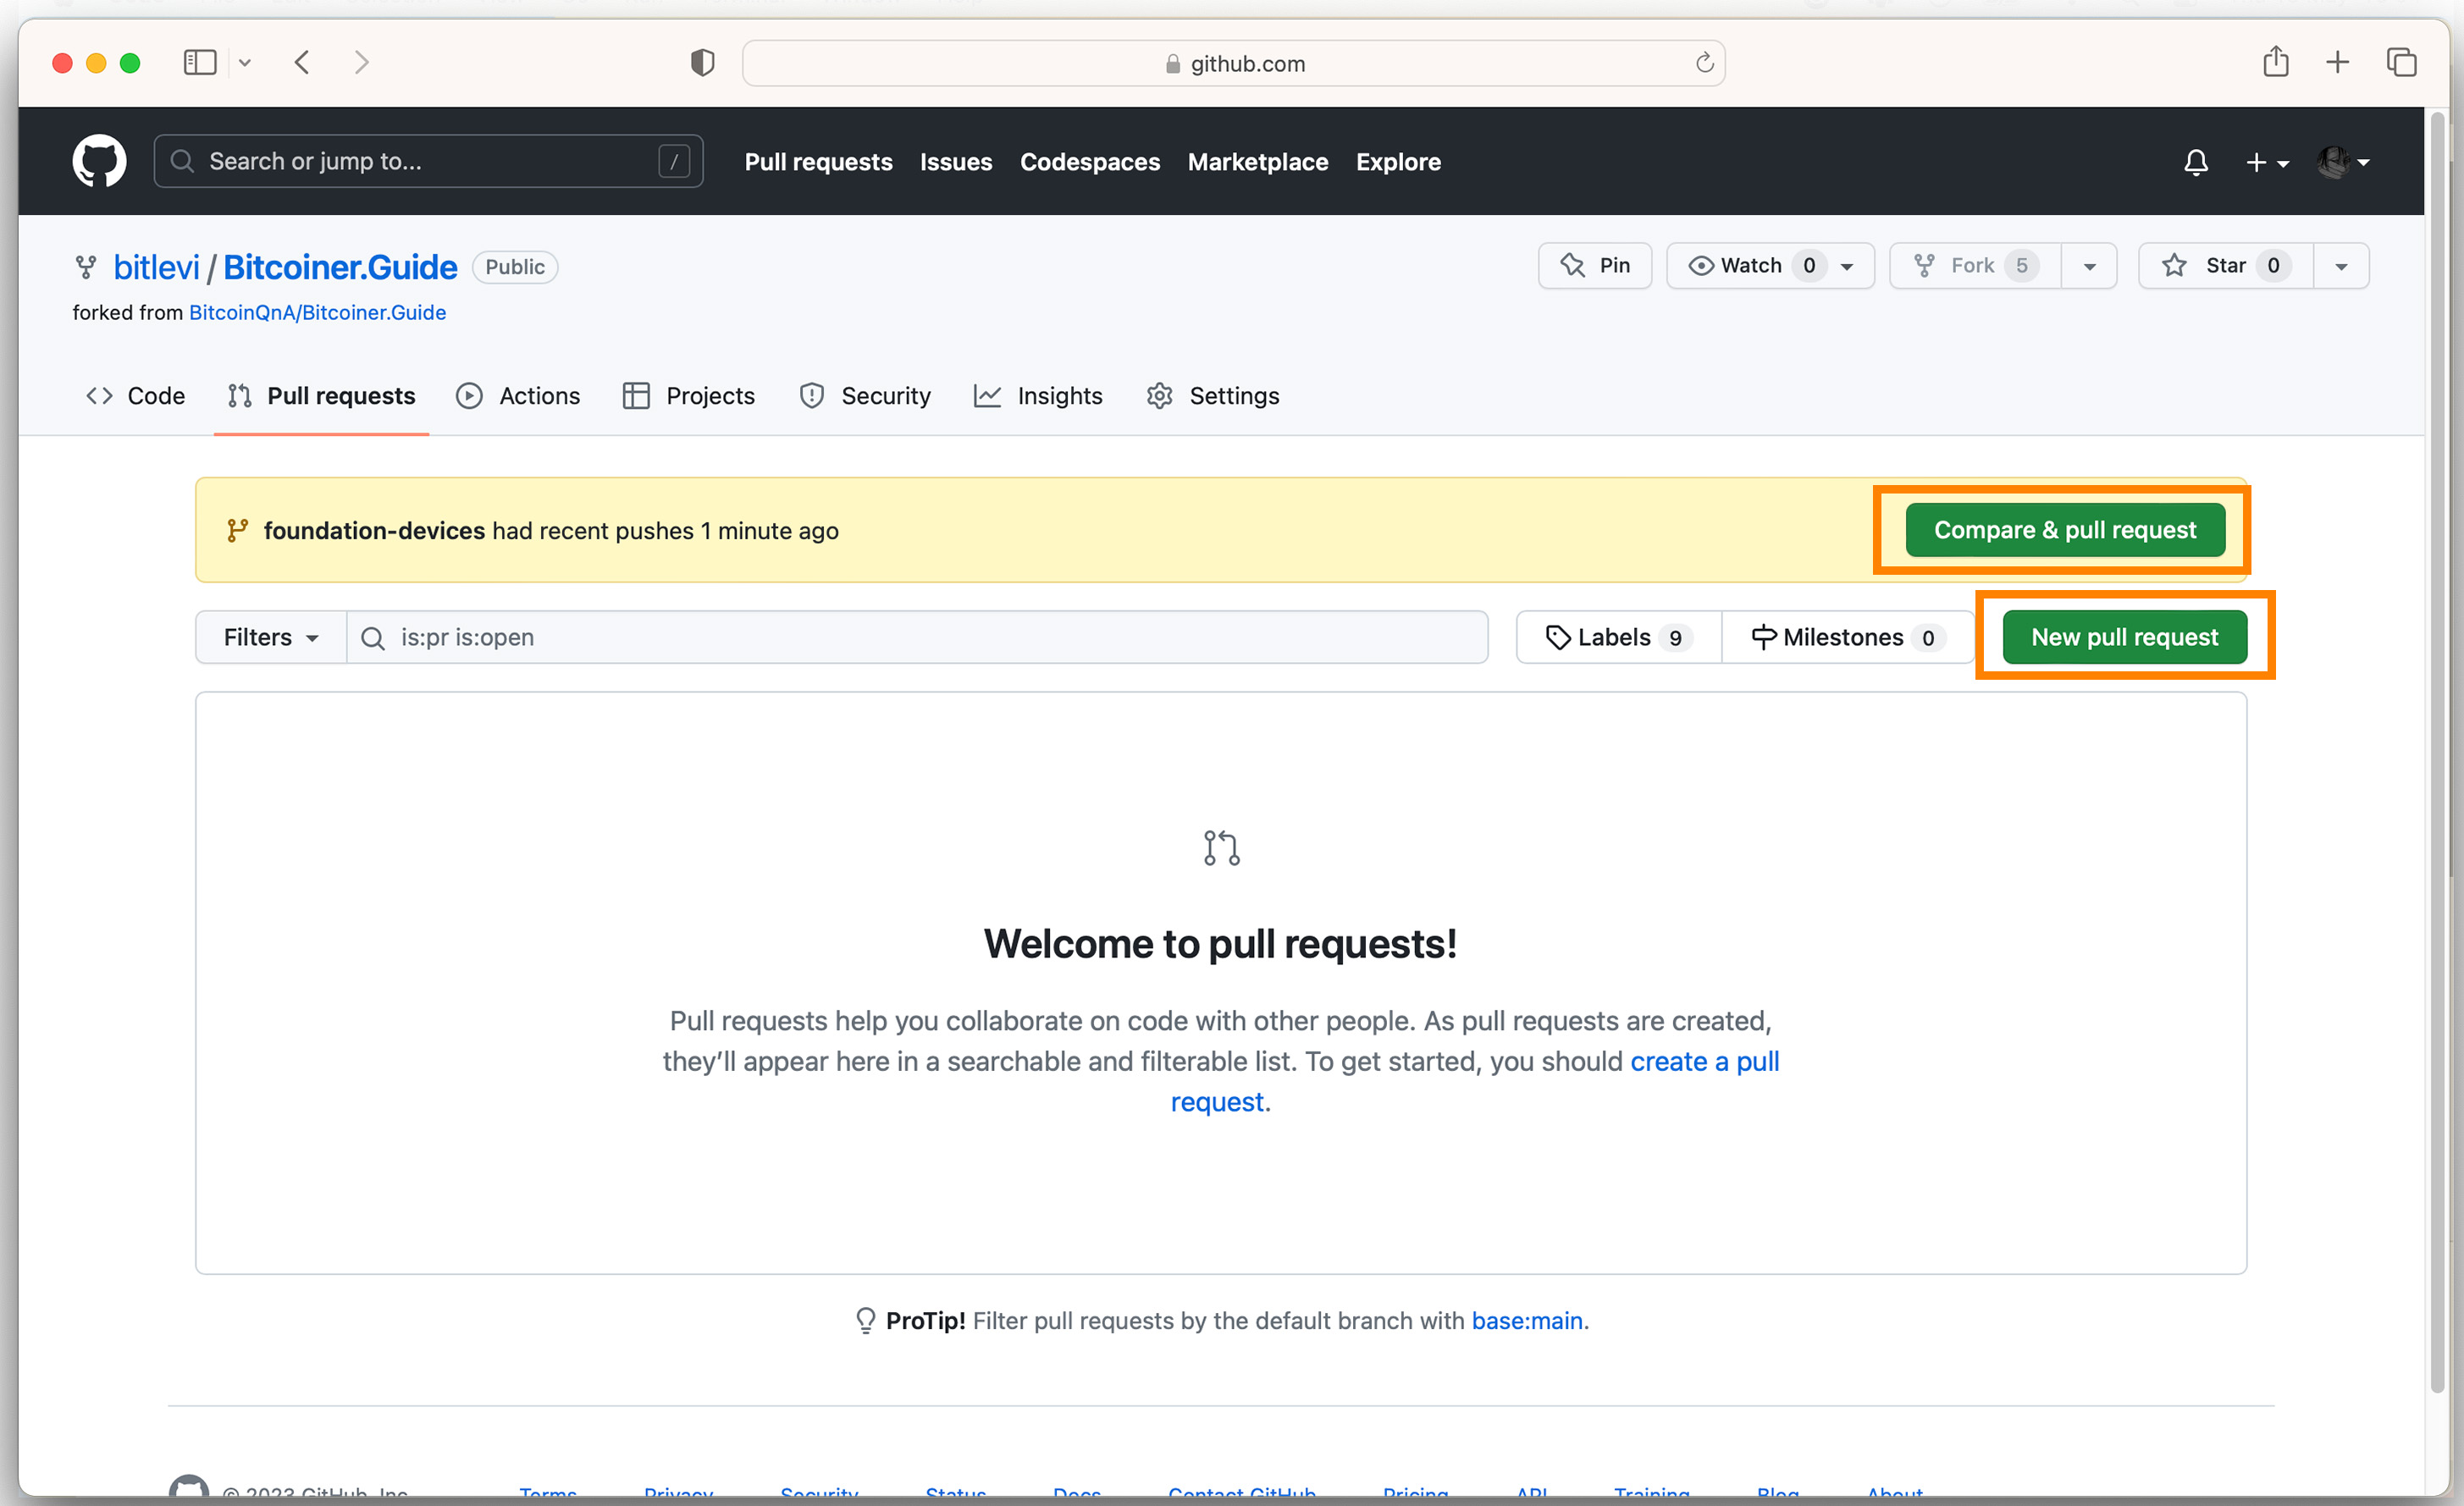
- Click the “Pull request” button.
- Click “New pull request” or “Compare & pull request”
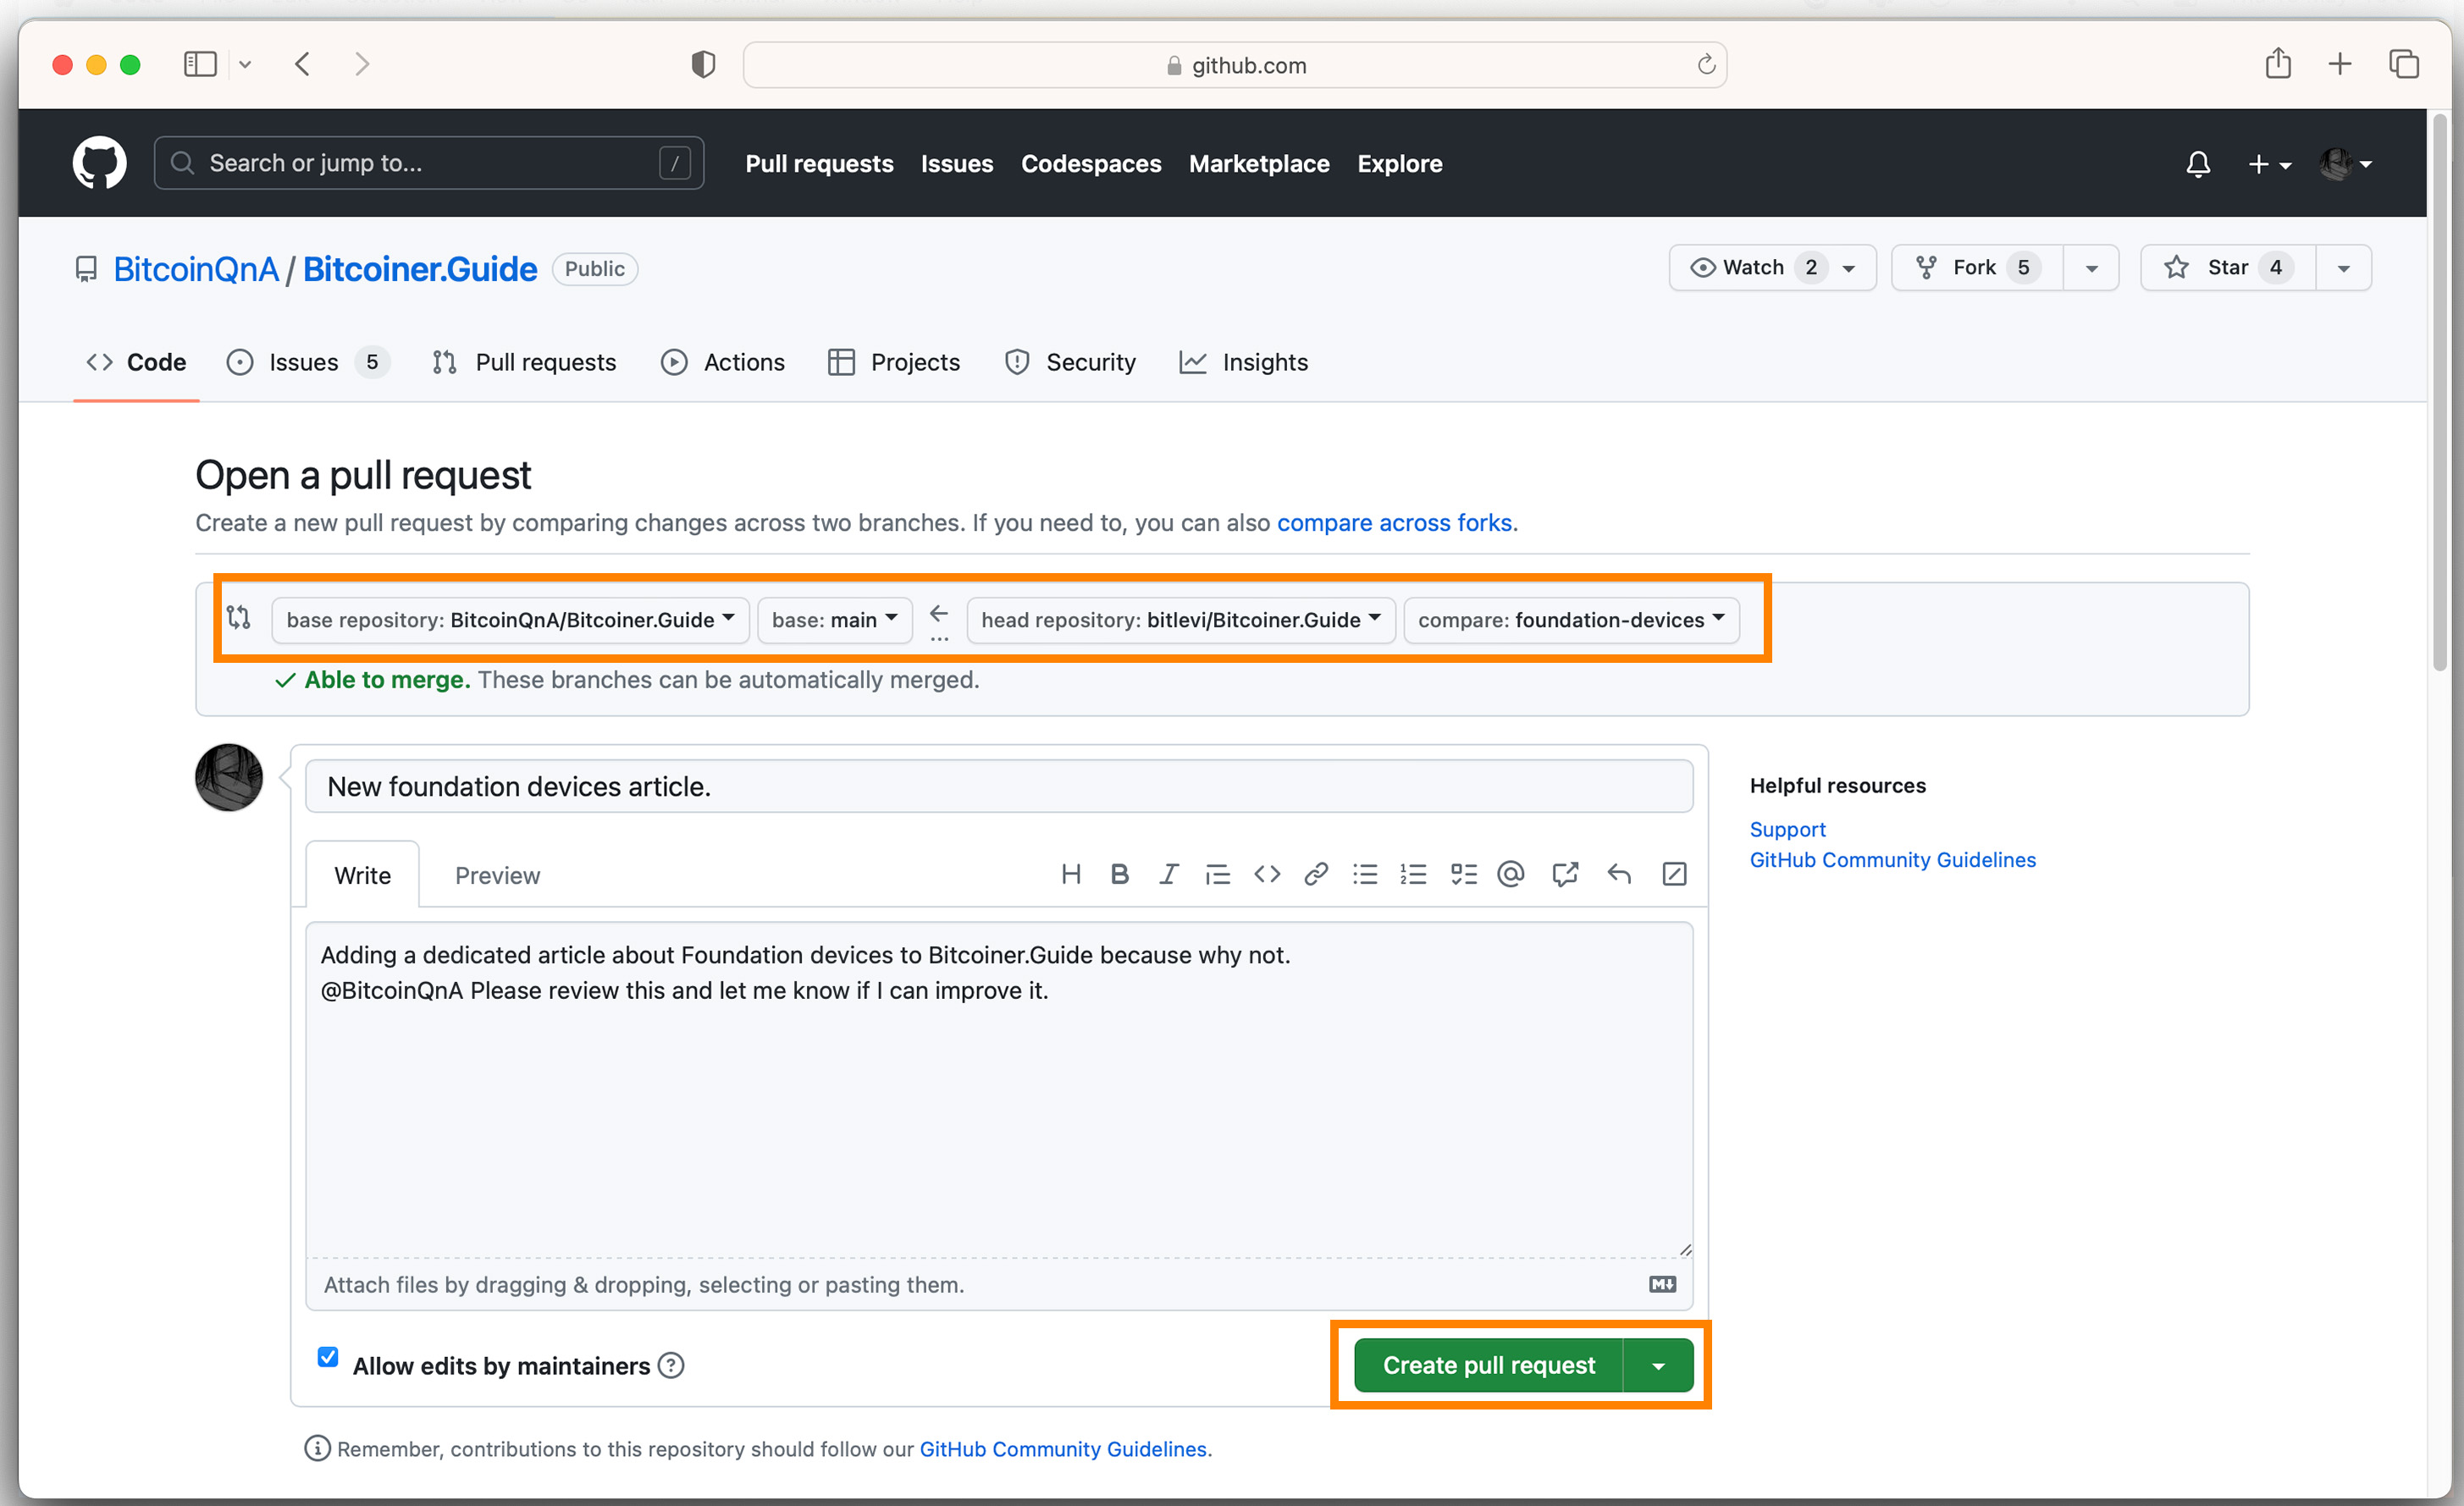
- Ensure the “base repository” is BitcoinQnA/Bitcoiner.Guide and the “head repository” is YOUR_GITHUB_USERNAME/Bitcoiner.Guide
- Click “Create pull request”.
- Enter a title and description for your changes.
- Click “Create pull request” again.
Congratulations! You have successfully forked Bitcoiner.Guide, made a contribution, and opened a pull request. The project’s maintainer, in this case QnA, will review your changes. He may accept them as they are, request changes, or discuss them with you.
Optional Steps
Step 9: Making Additional Changes After Creating a Pull Request
After you’ve created your pull request, you might realise you want to make more changes, or the project maintainers might ask you to revise something. You can do this without creating a new pull request. Here’s how:
- Make sure you’re on the correct branch in Visual Studio Code (the same branch you used when you made your initial changes and created the pull request).
- Make the additional changes in your code and save your files.
- Stage and commit these changes just like you did in Step 6-7
- Click on the three dots at the top of the Source Control view and select “Push”.
The new changes will automatically update in the existing pull request on GitHub. You don’t need to create a new pull request. If you want to add a comment about your changes, navigate to your pull request on GitHub and add a comment in the discussion thread.
Step 10: Keeping Your Fork Updated
This step ensures that you’re always working with the latest version of the project, and it makes it easier for the project owner to merge your changes.
When you fork a project, you create a snapshot of that project at a specific point in time. However, the original project doesn’t stop there. It continues to evolve as other contributors make changes. To keep your fork up-to-date with the latest changes from the original project, follow these steps:
- Add the original project as a remote repository: This step tells Git where the original project is located. You only need to do this once.
- Open Visual Studio Code and make sure you have the Bitcoiner.Guide project open.
- Open the terminal in Visual Studio Code (View -> Terminal).
- Type
git remote add upstream https://github.com/BitcoinQnA/Bitcoiner.Guide.gitand press Enter. This command adds a new remote repository (the original project) and names it “upstream”.
- Fetch the changes from the original project: This step downloads the latest changes from the original project, but it doesn’t merge them into your project yet.
- In the terminal, type
git fetch upstreamand press Enter.
- In the terminal, type
- Switch to your main branch: You should merge the changes into your main branch, not your feature branch (the one where you made your changes).
- In Visual Studio Code, click on the branch name at the bottom left of the screen (it should be the name of your feature branch).
- In the dialog box that pops up, select your main branch. It’s usually named
mainormaster.
- Merge the changes: This step combines the changes from the original project into your main branch.
- In the terminal, type
git merge upstream/mainorgit merge upstream/master(depending on the name of the main branch in the original project) and press Enter.
- In the terminal, type
Conclusion
Contributing to Open Source projects like Bitcoiner.Guide can seem intimidating, especially for beginners. However, this comprehensive guide provides all the necessary steps and tools you’ll need to confidently fork a project, make changes, and submit a pull request.
Remember, Open Source contribution is not just about coding; it’s about collaboration, learning, sharing, and improving. So don’t be deterred if things don’t go perfectly the first time. With practice, you’ll become more comfortable with the process. Every contribution, no matter how small, is valuable.
About the writer
Hi, I’m Bitlevi! I crystallise what I learn on my journey to sovereignty by writing about Bitcoin and FOSS tools. Feel free to message me on Twitter or visit my website. If you enjoyed this guide and would like to donate, here is my PayNym!