What is Coldcard?
Coldcard is a hardware wallet designed by the Coinkite team. A hardware wallets is a device with one main purpose, to keep your bitcoin private keys safe and secure. Anyone with access to your private keys has access to all of the bitcoin in that wallet. Coldcard does not come with its own app or any additional software. What you connect it with is completely up to you.
Why use Coldcard?
Most hardware wallets operate via connecting directly to a PC using a USB cable which can directly expose the device holding your keys to an internet connected computer that could be infected with malware. Coldcard is arguably the safest hardware wallet to store your private keys on because it implements completely air gapped functionality. This means you never have to physically connect your Coldcard to any other device (apart from a power source), ever!
Coldcard achieves its air gapped processes by passing information to your chosen software via a micro SD card. You can use Coldcard with any software that supports the BIP174 standard for partially signed transactions.
Features
You can find more detail for these (and more) on their documentation page.
- Tamper evident packaging and hardware (for supply chain attacks)
- Duress pin (opens a second wallet with a small amount of bitcoin to ward off coercive attackers)
- Brick me pin (kills the device to prevent coercive attacks)
- BIP174 (Partially signed bitcoin transactions)
- BIP39 (Optional passphrase)
- BIP85 (create additional seeds all backed up by a single ‘master seed’)
- Anti-Phishing words (highlights device tampering)
- Encrypted backups (Create multiple encrypted SD card backups)
- User added entropy (roll dice for an even more secure seed creation)
- Create paper wallets (create completely separate paper wallets)
- Multi-sig support (create and participate in multi signature wallets)
How does it work?
Coldcard can be used with many desktop wallets and now even some mobile wallets such as Blue Wallet. However, the most popular implementation to manage your Coldcard transactions is with Electrum desktop, which is what I’m going to walk you through. Whilst not absolutely essential, I would advise anyone to use Electrum wallet with your own backend server to preserve your privacy. Failing to do so will mean that you trust a third party server with your transactional and balance data. Fortunately, all of the popular node implementations come packaged with one.
Coldcard has lots of advanced features, but for this guide I will focus on 3 main areas.
- Setup and wallet creation
- Receive a transaction
- Send a transaction
Create your wallet
1. When you receive your Coldcard, take a close look at the packaging and check for any damage or evidence of it being messed with in any way. The tamper evident bag the device comes in should make this very easy.
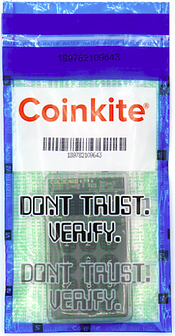
2. Plug the Coldcard into your power supply and check that the number displayed on the screen matches the one printed on the tamper evident bag.
3. The pin consists of two parts, each part must contain between two and six numbers. Create the first part of your pin. You will now see your anti phishing words, make a note of these. These are used as a reference when you enter your pin in the future. If someone were to swap your device with another one, when you entered the first part of your pin on the fraudulent device you would see completely different words which would warn you that something is wrong before you enter your full pin.

4. Create the second part of your pin. Worth remembering that if you lose either part of your pin, you lose access to the device.
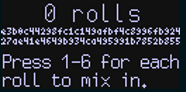
5. Create new wallet. You will now see a list of 24 seed words, these are the master backup to all bitcoin deposited to this wallet. At this stage if you press the number ‘4’ on the Coldcard you will be taken to the dice roll screen where you can roll a dice and add additional entropy to your seed generation. This reduces the trust in the devices inbuilt random number generator. You can roll as many times as you like. If you do this additional step, after you finish your dice rolls you will see a completely new seed. Write this down, keep it safe and do not share with anyone.
6. You will then be asked a series of questions based on your seed to ensure that you wrote it down correctly. Once you complete these, you have successfully generated yourself a bitcoin wallet, completely offline on a device that has never touched the internet.
Receiving a transaction
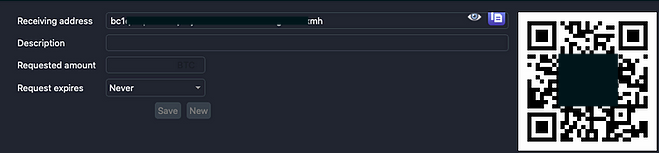
7. Go to advanced > Micro SD > Export wallet > Electrum Wallet, choose the wallet type native segwit and confirm. This will download a .json file to your SD card. This file alone cannot be used to spend funds, only view addresses and balances. Now remove the SD card and insert into your computer that is running Electrum.
8. Open Electrum and press ‘choose’ then select the wallet file that’s on the SD card and press next. The wallet will then load and you should see a warning asking you to connect your Coldcard, ignore this message and press no. You can now press receive and send some sats to your Coldcard.
Sending a transaction
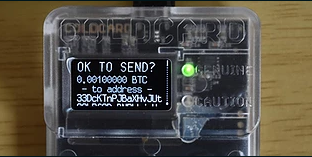
9. Hit send in Electrum and compose your transaction as you normally would by selecting the recipient address, fee rate and amount to send. Then press preview, check the info is correct and select save PSBT and save to your SD card. We now have the raw transaction created by Electrum, on the SD card ready to be signed by the offline Coldcard private keys. Now re-insert the SD back into your Coldcard.
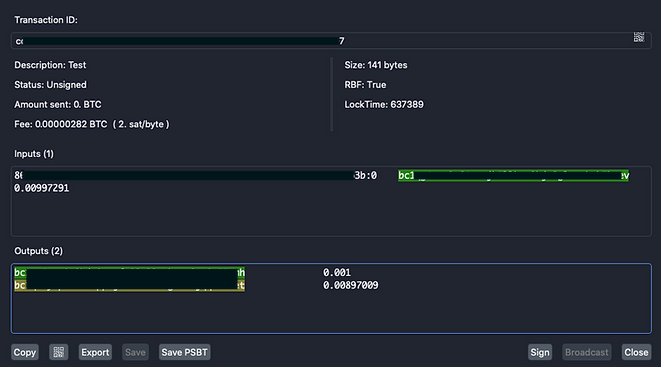
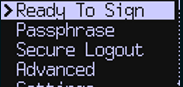
10. Enter your pin (and passphrase if you use one, more on this below) then press ‘Ready to sign’. Confirm you are happy with the transaction details and then press the tick button. Your Coldcard has now signed the transaction using its private keys and the signed transaction file will be saved to your SD card ready to be broadcast to the network.
11. Put the SD back into your computer and open Electrum. Click Tools > Load Transaction > From File. Select the .txn file that you just saved to the SD card and press open.
12. Hit broadcast and you’re done. The signed transaction will now be broadcast to the network (hopefully using your own node) and will await to be confirmed into a block.
Optional but recommended steps
Create wallet backup
The backup is an encrypted copy of your seed phrase and can be stored on an SD card and will allow you to restore your wallet in any ColdCard you have access to.
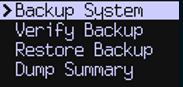
Insert your micro SD card and go to advanced > backup > backup system. You will now be greeted with a list of 12 words, write them down as they will be used as the password to your encrypted backup file. Answer the questions to confirm your backup and the file will be written to the SD card. You can repeat this process multiple times to create many backups on different SD cards. Your passphrase is never part of this back up so ensure you keep that and those 12 words safe.
Add a passphrase
A passphrase is an additional word or phrase that is added to your original seed which creates a completely separate wallet. It can be used as an extra layer of security in case your seed phrase becomes compromised. Without both your seed and your passphrase an attacker cannot access your bitcoin.
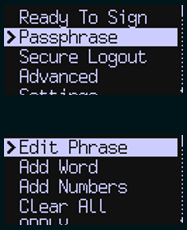
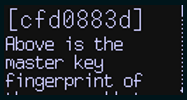
Click passphrase, read the message, press ok and then ‘edit passphrase’. Enter your desired passphrase and hit apply. One thing to remember, once you have specified a passphrase you must enter it every time you power up your Coldcard. To ensure you have entered the passphrase correctly ensure you make a note of the wallet fingerprint. This is a unique identifier, so check it matches each time you enter your passphrase.
Where can I learn more?
If you want to try Coldcard for yourself visit their website and for more info on the features not covered in detail here visit their documentation.
If you need help setting up your Coldcard, I offer private support calls for those that benefit from more personalised tuition.
If you prefer video guides, check out this fantastic one from Keep It Simple Bitcoin. and this one from TFTC on the same process but using Wasabi wallet instead of Electrum.
Disclaimer - All views expressed in this article are my own and not those of the Coinkite team. I am not affiliated with Coinkite.